- Home
- Microsoft
- Upgrading Your Skills to MCSA Windows Server 2012
- Microsoft.70-417.v2019-08-14.q430
- Question 159
Valid 70-417 Dumps shared by EduDump.com for Helping Passing 70-417 Exam! EduDump.com now offer the newest 70-417 exam dumps, the EduDump.com 70-417 exam questions have been updated and answers have been corrected get the newest EduDump.com 70-417 dumps with Test Engine here:
Access 70-417 Dumps Premium Version
(455 Q&As Dumps, 35%OFF Special Discount Code: freecram)
<< Prev Question Next Question >>
Question 159/430
You have a server named File1 that runs Windows Server 2012 R2. File1 has the File Server role service installed. You plan to back up all shared folders by using Microsoft Online Backup.
You download and install the Microsoft Online Backup Service Agent on File1.
You need to ensure that you use Windows Server Backup to back up data to Microsoft Online Backup.
What should you do?
You download and install the Microsoft Online Backup Service Agent on File1.
You need to ensure that you use Windows Server Backup to back up data to Microsoft Online Backup.
What should you do?
Correct Answer: C
Explanation/Reference:
Explanation:
Download and install the Windows Azure Online Backup Agent After you create an account on the Windows Azure Online Backup website, you can download the Windows Azure Online Backup Agent and install it locally.
An Online Backup node then appears in the navigation pane of the Windows Server Backup console, as shown in Figure 12-
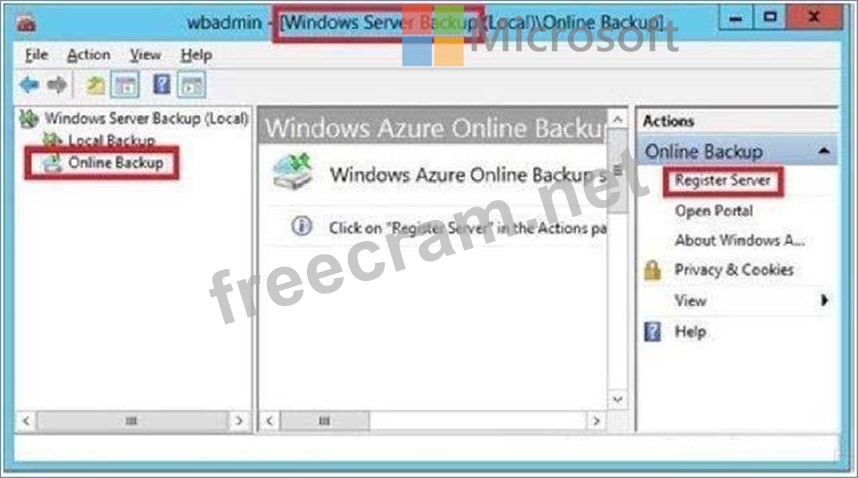
If you prefer, you can also configure online backups from the Windows Azure Online Backup console, which becomes available after you install the agent. The Windows Azure Online Backup console provides exactly the same set of options as the Online Backup node in the Windows Server Backup console.
Register server The next step is to register your server. Registering a server enables you to perform backups from that same server only. (Remember this point for the exam.) To register the server, from the Actions menu, select Register Server. The Register Server Wizard includes two configuration steps. First, you are given an opportunity to specify a proxy server if desired. Second, you are asked to provide a passphrase that will be used to encrypt your backup data and a location to save this passphrase in a file.
You need to provide this passphrase when you perform a restore operation, so it's essential that you don't lose it. (Microsoft doesn't maintain a copy of your passphrase.) A Generate Passphrase option creates the passphrase for you automatically. After you register a server, new options for Online Backup appear in the Actions pane, including Schedule Backup, Recover Data, Change Properties, and Unregister Server.
Explanation:
Download and install the Windows Azure Online Backup Agent After you create an account on the Windows Azure Online Backup website, you can download the Windows Azure Online Backup Agent and install it locally.
An Online Backup node then appears in the navigation pane of the Windows Server Backup console, as shown in Figure 12-
If you prefer, you can also configure online backups from the Windows Azure Online Backup console, which becomes available after you install the agent. The Windows Azure Online Backup console provides exactly the same set of options as the Online Backup node in the Windows Server Backup console.
Register server The next step is to register your server. Registering a server enables you to perform backups from that same server only. (Remember this point for the exam.) To register the server, from the Actions menu, select Register Server. The Register Server Wizard includes two configuration steps. First, you are given an opportunity to specify a proxy server if desired. Second, you are asked to provide a passphrase that will be used to encrypt your backup data and a location to save this passphrase in a file.
You need to provide this passphrase when you perform a restore operation, so it's essential that you don't lose it. (Microsoft doesn't maintain a copy of your passphrase.) A Generate Passphrase option creates the passphrase for you automatically. After you register a server, new options for Online Backup appear in the Actions pane, including Schedule Backup, Recover Data, Change Properties, and Unregister Server.


- Question List (430q)
- Question 1: Your role of Network Administrator at ABC.com includes the m...
- Question 2: Your role of Network Administrator at ABC.com includes the m...
- Question 3: Server manager is a great tool for managing most of your ser...
- Question 4: They are active as an IT consultant for a fashion company. T...
- Question 5: Your network contains an Active Directory domain named conto...
- Question 6: Your network contains an Active Directory domain named adatu...
- Question 7: You have a server named Server1 that runs a Server Core Inst...
- Question 8: You have a server named Core1 that has a Server Core Install...
- Question 9: Your corporate network includes an Active Directory Domain S...
- Question 10: Your network contains two Active Directory forests named con...
- Question 11: You have a server named Server1 that runs Windows Server 201...
- Question 12: You administrate an Active Directory domain named EnsurePass...
- Question 13: Your network contains an Active Directory domain named conto...
- Question 14: Your role of Network Administrator at ABC.com includes the m...
- Question 15: Your network contains an Active Directory forest named conto...
- Question 16: Your network contains an Active Directory domain named conto...
- Question 17: You have a server named Data1 that runs a Server Core Instal...
- Question 18: Note: This question is part of a series of questions that us...
- Question 19: You plan to allow users to run internal applications from ou...
- Question 20: You create a new virtual disk in a storage pool by using the...
- Question 21: Your network contains an Active Directory domain named adatu...
- Question 22: Your role of Network Administrator at ABC.com includes the m...
- Question 23: You have a server named Server1 that runs Windows Server 201...
- Question 24: You have a server named Server1 that runs Windows Server 201...
- Question 25: Your network contains an Active Directory forest. The forest...
- Question 26: Your role of Network Administrator at ABC.com includes the m...
- Question 27: Your network contains an Active Directory forest named conto...
- Question 28: Your network contains an Active Directory domain named conto...
- Question 29: You have just finished installing Windows Server 2008 on a n...
- Question 30: In an isolated test environment, you deploy a server named S...
- Question 31: Your network contains an Active Directory domain named conto...
- Question 32: You have a server named Server1 that runs Windows Server 201...
- Question 33: Your network contains an Active Directory domain named conto...
- Question 34: You work as a Network Administrator at ABC.com. The network ...
- Question 35: Your network contains an Active Directory forest named adatu...
- Question 36: You have a server named Server1 that runs Windows Server 201...
- Question 37: You have a laptop named Computer 1. Computer1 runs Windows 8...
- Question 38: Your network contains an Active Directory domain named conto...
- Question 39: Your role of Network Administrator at ABC.com includes the m...
- Question 40: You work for a company named ABC.com. Your role of Network A...
- Question 41: Your network contains one Active Directory forest named cont...
- Question 42: Your network contains an Active Directory domain named adatu...
- Question 43: You have a VHD that contains an image of Windows Server 2012...
- Question 44: Your role of Network Administrator at ABC.com includes the m...
- Question 45: Your network contains an Active Directory domain named conto...
- Question 46: A server named Server01 is running Server Core at your compa...
- Question 47: Your role of Network Administrator at ABC.com includes the m...
- Question 48: Your network contains an Active Directory forest named conto...
- Question 49: Your network contains an Active Directory domain named conto...
- Question 50: Your network contains an Active Directory domain named conto...
- Question 51: Note: This question is part of series of questions that use ...
- Question 52: Your role of Network Administrator at ABC.com includes the m...
- Question 53: Your network contains an Active Directory domain named conto...
- Question 54: You have a Hyper-V host named Server1 that runs Windows Serv...
- Question 55: You have a file server named Server1 that runs Windows Serve...
- Question 56: Your network contains an Active Directory domain named conto...
- Question 57: Your network contains one Active Directory domain. The domai...
- Question 58: Your network contains an Active Directory domain named conto...
- Question 59: You plan to allow users to run internal applications from ou...
- Question 60: You have a print server named Print1 that runs Windows Serve...
- Question 61: In Windows Server 2012 R2, you can remove the Server Graphic...
- Question 62: You work for a company named ABC.com. Your role of Network A...
- Question 63: Your network contains two servers named Server 1 and Server ...
- Question 64: Your network contains two servers named Server1 and Server2 ...
- Question 65: You perform a Server Core Installation of Windows Server 201...
- Question 66: You have a server named Server1 that runs Windows Server 201...
- Question 67: You have a server named Server1 that runs Windows Server 201...
- Question 68: Your network contains an Active Directory forest that contai...
- Question 69: Your network contains a server named Server1 that runs Windo...
- Question 70: Your network contains an Active Directory domain named conto...
- Question 71: You have a server named Server1 that runs Windows Server 201...
- Question 72: You have a server named Print1 that runs Windows Server 2012...
- Question 73: Your network contains an Active Directory domain named adatu...
- Question 74: Your role of Network Administrator at ABC.com includes the m...
- Question 75: Your Network contains oneActive Directory domain named conto...
- Question 76: Your role of Network Administrator at ABC.com includes the m...
- Question 77: Your network contains an Active Directory domain named conto...
- Question 78: Your network contains an Active Directory domain named conto...
- Question 79: You have an offline image of a server that runs Windows Serv...
- Question 80: Your network contains an Active Directory domain named conto...
- Question 81: Your network contains one Active Directory domain named cont...
- Question 82: Your network contains an Active Directory domain named conto...
- Question 83: You deploy a windows Server Update (WSUS) server named Serve...
- Question 84: Note: This question is part of a series of questions that us...
- Question 85: Your network contains an Active Directory domain named adatu...
- Question 86: Your network contains an Active Directory domain named conto...
- Question 87: Your network contains an Active Directory forest. The forest...
- Question 88: You have a server named Server1 that has a Server Core insta...
- Question 89: Your network contains an Active Directory domain named conto...
- Question 90: Is the following statement true or false? When a printer is ...
- Question 91: You have a Hyper-V host named Server1 that runs Windows Serv...
- Question 92: Your role of Network Administrator at ABC.com includes the m...
- Question 93: You manage a Hyper-V 2012 cluster by using System Center Vir...
- Question 94: A company has data centers in Seattle and New York. A high-s...
- Question 95: Your network contains one Active Directory Domain Services d...
- Question 96: DNS record types come in many forms, but which record type i...
- Question 97: Your role of Network Administrator at ABC.com includes the m...
- Question 98: Your network contains two servers named Server1 and Server2....
- Question 99: Your network contains an Active Directory domain named conto...
- Question 100: Your network contains a Windows Server 2012 R2 image named S...
- Question 101: Your role of Network Administrator at ABC.com includes the m...
- Question 102: Your manager has asked you to create various user objects us...
- Question 103: Your network contains a server named Server1 that runs Windo...
- Question 104: Your network contains an Active Directory domain named conto...
- Question 105: Your network contains an Active Directory domain named conto...
- Question 106: Your corporate network includes an Active Directory Domain S...
- Question 107: Your role of Network Administrator at ABC.com includes the m...
- Question 108: Your network contains an Active Directory domain named conto...
- Question 109: Your network contains an Active Directory domain named conto...
- Question 110: Is the following statement about Hyper-V true or false? Hype...
- Question 111: Your network contains an Active Directory domain named conto...
- Question 112: You are the administrator of an Active Directory Domain Serv...
- Question 113: Your network contains an Active Directory domain named conto...
- Question 114: Your network contains an Active Directory domain named conto...
- Question 115: Your network contains an Active Directory domain named conto...
- Question 116: You have a server named Server1 that runs Windows Server 201...
- Question 117: Your role of Network Administrator at ABC.com includes the m...
- Question 118: Your role of Network Administrator at ABC.com includes the m...
- Question 119: Your role of Network Administrator at ABC.com includes the m...
- Question 120: Your network contains an Active Directory domain named conto...
- Question 121: You have a server named Server1 that runs Windows Server 201...
- Question 122: A user from your organization has reported to the IT helpdes...
- Question 123: Your network contains one Active Directory domain named cont...
- Question 124: You have a server named Server1 that runs a Server Core Inst...
- Question 125: Your network contains an Active Directory forest. The forest...
- Question 126: Your network contains an Active Directory domain named conto...
- Question 127: Your network contains an Active Directory domain named conto...
- Question 128: Your role of Network Administrator at ABC.com includes the m...
- Question 129: You have a server named Server1 that runs Windows Server 201...
- Question 130: Which terminology is being described below? Time synchroniza...
- Question 131: Your network contains an Active Directory domain named conto...
- Question 132: Your network contains a server named Server1 that runs Windo...
- Question 133: Your network contains an Active Directory forest named conto...
- Question 134: Your network contains an active directory domain named Conto...
- Question 135: Your network contains an Active Directory domain named conto...
- Question 136: You work for a company named ABC.com. Your role of Network A...
- Question 137: Your network contains a server named Server1 that runs Windo...
- Question 138: You work as a Network Administrator at ABC.com. The network ...
- Question 139: Your network contains an Active Directory domain named conto...
- Question 140: Your company's security policy states that all of the server...
- Question 141: You have 30 servers that run Windows Server 2012 R2. All of ...
- Question 142: Your network contains an Active Directory domain named conto...
- Question 143: You have a server named Server1 that runs Windows Server 201...
- Question 144: Your Network contains one Active Directory domain named cont...
- Question 145: Your network contains an Active Directory domain named conto...
- Question 146: Your role of Network Administrator at ABC.com includes the m...
- Question 147: Your role of Network Administrator at ABC.com includes the m...
- Question 148: Your network contains a Hyper-V host named Server1 that runs...
- Question 149: Your network contains one Active Directory domain named cont...
- Question 150: You have 3 servers that runs Windows Server 2012 R2. The ser...
- Question 151: Your network contains an Active Directory domain named conto...
- Question 152: You have a server named Server1 that Runs Windows Server 201...
- Question 153: Your role of Network Administrator at ABC.com includes the m...
- Question 154: Your network contains an Active Directory domain named conto...
- Question 155: Your network contains an Active Directory domain named conto...
- Question 156: You have a Hyper-V host named Server1 that runs Windows Serv...
- Question 157: Your network contains two servers named HV1 and HV2. Both se...
- Question 158: You have a group managed Service Account name Account01. Onl...
- Question 159: You have a server named File1 that runs Windows Server 2012 ...
- Question 160: Your network contains an Active Directory domain named conto...
- Question 161: Your network contains an Active Directory domain named conto...
- Question 162: Note: This question is part of a series of questions that us...
- Question 163: Your network contains an Active Directory forest named conto...
- Question 164: Note: This Question is part of series of question that use t...
- Question 165: Your network contains an Active Directory domain named conto...
- Question 166: You can create a printing pool to automatically distribute p...
- Question 167: Your network contains an Active Directory domain named conto...
- Question 168: Your role of Network Administrator at ABC.com includes the m...
- Question 169: Your network contains an Active Directory domain named conto...
- Question 170: You have a server named Server1 that runs a Server Core inst...
- Question 171: Your network contains an Active Directory domain named conto...
- Question 172: Your network contains an Active Directory domain named conto...
- Question 173: Your network contains an Active Directory domain named conto...
- Question 174: Your network contains an Active Directory domain named adatu...
- Question 175: Your role of Network Administrator at ABC.com includes the m...
- Question 176: Your role of Network Administrator at ABC.com includes the m...
- Question 177: Your network contains an Active Directory domain named conto...
- Question 178: You have a virtual machine named VM1 that runs on a host nam...
- Question 179: You have a DNS server that runs Windows Server 2012 R2. The ...
- Question 180: A network technician installs Windows Server 2012 Standard o...
- Question 181: Your network contains an Active Directory domain named conto...
- Question 182: An organization uses an Active Directory Rights Management S...
- Question 183: Your network contains two Active Directory forests named con...
- Question 184: Your role of Network Administrator at ABC.com includes the m...
- Question 185: OCSetup is available as part of the Windows Vista and Window...
- Question 186: You perform a Server Core Installation of Windows Server 201...
- Question 187: You have a server named Server1 that runs Windows Server 201...
- Question 188: Your role of Network Administrator at ABC.com includes the m...
- Question 189: Your network contains an Active Directory domain named conto...
- Question 190: Your network contains an Active Directory domain named conto...
- Question 191: Your network contains multiple subnets. On one of the subnet...
- Question 192: Your company has a main office and a branch office. The netw...
- Question 193: Your network contains an Active Directory domain named conto...
- Question 194: Your network contains a single Active Directory domain named...
- Question 195: You have a server that runs Windows Server 2012 R2. The disk...
- Question 196: Your corporate network includes an Active Directory Domain S...
- Question 197: Your network contains an Active Directory domain named conto...
- Question 198: Your role of Network Administrator at ABC.com includes the m...
- Question 199: Your network contains an Active Directory domain named conto...
- Question 200: Your network contains an Active Directory forest named conto...
- Question 201: You have an enterprise certification authority (CA) named CA...
- Question 202: Your network contains an Active Directory domain named conto...
- Question 203: Note: This question is a part of series of questions that us...
- Question 204: Your network contains one Active Directory domain named cont...
- Question 205: Your network contains an Active Directory domain named conto...
- Question 206: Your network contains an Active Directory domain named conto...
- Question 207: You have a server named Server1 that runs Windows Server 201...
- Question 208: Note: This question is part of a series of questions that us...
- Question 209: Your network contains an Active Directory domain named conto...
- Question 210: Your network contains one Active Directory domain. The domai...
- Question 211: You have a server that runs server core of windows 2012 r2 s...
- Question 212: You have a server named Server1 that runs Windows Server 201...
- Question 213: You work for a company named ABC.com. Your role of Network A...
- Question 214: Your network contains an Active Directory domain named conto...
- Question 215: Your network contains a server named Server1 that runs Windo...
- Question 216: Your network contains an Active Directory domain named conto...
- Question 217: Your network contains two servers named Server1 and Server2 ...
- Question 218: You deploy an Active Directory Federation Services (AD FS) i...
- Question 219: Note: This question is part of series of questions that use ...
- Question 220: Your role of Network Administrator at ABC.com includes the m...
- Question 221: Your network contains one Active Directory domain named cont...
- Question 222: Your network contains a Hyper-V host named Hyperv1. Hyperv1 ...
- Question 223: Your network contains an Active Directory domain named conto...
- Question 224: Your network contains an Active Directory domain named conto...
- Question 225: You have a server named Server1 that has a Server Core insta...
- Question 226: Your network contains an Active Directory domain named conto...
- Question 227: Your network contains an active directory domain named Conto...
- Question 228: You have a server named Server1 that runs a full installatio...
- Question 229: Your role of Network Administrator at ABC.com includes the m...
- Question 230: Your network contains an Active Directory domain named conto...
- Question 231: Select the missing tool name from the sentence below: You ca...
- Question 232: You have DHCP server named Server1 that runs Windows Server ...
- Question 233: You have a server named Server1 that runs Windows Server 201...
- Question 234: Your network contains an Active Directory domain named conto...
- Question 235: You plan to deploy a file server to a temporary location. Th...
- Question 236: A user has locked his account (again!) and you need to unloc...
- Question 237: Your role of Network Administrator at ABC.com includes the m...
- Question 238: Your network contains a server named Server1 that runs Windo...
- Question 239: Your IT manager is concerned that someone is trying to gain ...
- Question 240: Your network contains an Active Directory domain named conto...
- Question 241: Your network contains an Active Directory domain named conto...
- Question 242: Dynamic memory is a great feature that allows you to manage ...
- Question 243: Your network contains an Active Directory domain named conto...
- Question 244: Your network contains an Active Directory domain named conto...
- Question 245: Your network contains two Web servers named Server1 and Serv...
- Question 246: Your network contains an Active Directory domain named conto...
- Question 247: Your role of Network Administrator at ABC.com includes the m...
- Question 248: You have a server named Server1 that runs Windows Server 201...
- Question 249: Your network contains an Active Directory domain named conto...
- Question 250: Which terminology is being described below? A _________ trus...
- Question 251: You have decided to install Windows Server 2012 R2 by choosi...
- Question 252: You have a server named Server1 that runs Windows Server 201...
- Question 253: Your network contains an Active Directory domain named conto...
- Question 254: Your network contains an Active Directory domain named conto...
- Question 255: You have 20 servers that run Windows Server 2012 R2. You nee...
- Question 256: Server manager is a great tool for managing most of your ser...
- Question 257: Your network contains an Active Directory domain named conto...
- Question 258: Your network contains several servers that run Windows Serve...
- Question 259: Your network contains an Active Directory domain named adatu...
- Question 260: Your network contains an Active Directory domain named adatu...
- Question 261: Your network contains an Active Directory domain named adatu...
- Question 262: Your network contains an Active Directory domain named conto...
- Question 263: You have a server named Server1 that runs Windows Server 201...
- Question 264: Your network contains an Active Directory domain named conto...
- Question 265: Note: This question is part of a series of questions that us...
- Question 266: Your network contains an Active Directory forest named conto...
- Question 267: Your network contains an Active Directory forest named conto...
- Question 268: You work as a Network Administrator at ABC.com. The network ...
- Question 269: You have a server named Server1 that runs Windows Server 201...
- Question 270: Your network contains two servers that run Windows Server 20...
- Question 271: Your network contains two Active Directory forests named con...
- Question 272: Your network contains two Active Directory forests named con...
- Question 273: Your network contains two DNS servers named DNS1 and DNS2 th...
- Question 274: You have a cluster named Cluster1 that contains two nodes. B...
- Question 275: Your network contains an Active Directory domain named conto...
- Question 276: Your network contains an Active Directory domain named conto...
- Question 277: Your network contains an Active Directory domain named conto...
- Question 278: Your network contains three Active Directory forests. Each f...
- Question 279: You have a datacenter that contains six servers. Each server...
- Question 280: Your role of Network Administrator at ABC.com includes the m...
- Question 281: You deploy a Windows Server Update Services (WSUS) server na...
- Question 282: Your network contains an Active Directory domain named conto...
- Question 283: After setting up several Active Directory users for differen...
- Question 284: Which of the following situations would you use AD LDS?...
- Question 285: You have a server that runs Windows Server 2012 R2. You have...
- Question 286: Your network contains an Active Directory domain named conto...
- Question 287: Note: This question is part of series of questions that use ...
- Question 288: Which feature is described below? You can use the ___ to red...
- Question 289: Your network contains an Active Directory domain named conto...
- Question 290: Note: This question is part of series of questions that use ...
- Question 291: Your network contains an Active Directory domain named conto...
- Question 292: Your role of Network Administrator at ABC.com includes the m...
- Question 293: Your network contains one Active Directory domain named cont...
- Question 294: Your network contains a server named Server1 that has the Ne...
- Question 295: Your network contains an Active Directory domain named conto...
- Question 296: Your network contains an Active Directory domain named conto...
- Question 297: Your network contains an Active Directory domain named conto...
- Question 298: Your role of Network Administrator at ABC.com includes the m...
- Question 299: Your network contains an Active Directory domain named conto...
- Question 300: Your network contains one Active Directory domain named cont...
- Question 301: Your role of Network Administrator at ABC.com includes the m...
- Question 302: You have a Direct Access Server named Server1 running Server...
- Question 303: Your network contains an Active Directory domain named conto...
- Question 304: Your network contains an Active Directory domain named conto...
- Question 305: Your role of Network Administrator at ABC.com includes the m...
- Question 306: Your role of Network Administrator at ABC.com includes the m...
- Question 307: Your network contains an Active Directory forest named conto...
- Question 308: Your network contains an Active Directory domain named conto...
- Question 309: You have a server named Server1 that runs Windows Server 201...
- Question 310: Your network contains one Active Directory domain named cont...
- Question 311: Your network contains an Active Directory domain named conto...
- Question 312: You have a server named FS1 that runs Windows Server 2012 R2...
- Question 313: Your network contains an Active Directory domain named conto...
- Question 314: Your role of Network Administrator at ABC.com includes the m...
- Question 315: Your network contains an Active Directory domain named conto...
- Question 316: Your network contains one Active Directory domain named cont...
- Question 317: Your role of Network Administrator at ABC.com includes the m...
- Question 318: Your role of Network Administrator at ABC.com includes the m...
- Question 319: You have a failover cluster named Cluster1 that contains fou...
- Question 320: Your network contains two Web servers named Server1 and Serv...
- Question 321: Your role of Network Administrator at ABC.com includes the m...
- Question 322: Your network contains an Active Directory domain named conto...
- Question 323: Your network contains an Active Directory domain named conto...
- Question 324: Your role of Network Administrator at ABC.com includes the m...
- Question 325: You have a server named Server1 that runs Windows Server 201...
- Question 326: You are a network administrator of an Active Directory domai...
- Question 327: Managing Group Policy objects is a tiresome task. Which of t...
- Question 328: Your network contains an Active Directory domain named conto...
- Question 329: RODC comes with a number of features that focus on heightene...
- Question 330: Your network contains an Active Directory domain named conto...
- Question 331: Your network contains an Active Directory domain named adatu...
- Question 332: You have a server named Server1 that runs Windows Server 201...
- Question 333: Your network contains an Active Directory domain named conto...
- Question 334: Your role of Network Administrator at ABC.com includes the m...
- Question 335: Your network contains an Active Directory domain named conto...
- Question 336: Complete the missing word from the sentence below that is de...
- Question 337: Your network contains an Active Directory domain named adatu...
- Question 338: Your network contains an Active Directory domain named conto...
- Question 339: Your network contains an Active Directory domain named conto...
- Question 340: Your network contains an Active Directory domain named conto...
- Question 341: You have a server named Server1 that runs Windows Server 201...
- Question 342: Your network contains an Active Directory domain named conto...
- Question 343: You create trusts in Windows Server 2008 with the New Trust ...
- Question 344: You have a server named LON-DC1 that runs Windows Server 201...
- Question 345: Your network contains an Active Directory domain named conto...
- Question 346: Your network contains an Active Directory domain named conto...
- Question 347: You have 10 domain controllers in a domain. You need to prev...
- Question 348: Your role of Network Administrator at ABC.com includes the m...
- Question 349: Your network contains an Active Directory domain named conto...
- Question 350: Your role of Network Administrator at ABC.com includes the m...
- Question 351: Your network includes five servers running the operating sys...
- Question 352: NOTE: Once you answer this question, you will NOT be able to...
- Question 353: You work for a company named ABC.com. Your role of Network A...
- Question 354: Your network contains an Active Directory domain named conto...
- Question 355: Your network contains an Active Directory domain named conto...
- Question 356: You have three Windows Server Update Services (WSUS) Servers...
- Question 357: You have a server named Server1 that runs Windows Server 201...
- Question 358: You work for a company named ABC.com. Your role of Network A...
- Question 359: You have a server named Server1 that runs Windows Server 201...
- Question 360: You work for a company named ABC.com. Your role of Network A...
- Question 361: Your network contains an Active Directory domain named conto...
- Question 362: You are an Active Directory administrator for Contoso, Ltd. ...
- Question 363: Your role of Network Administrator at ABC.com includes the m...
- Question 364: You work as a Network Administrator at ABC.com. The network ...
- Question 365: You have a server named Server1 that runs Windows Server 201...
- Question 366: Your network contains an Active Directory forest named conto...
- Question 367: You have a server named Served that runs Windows Server 2012...
- Question 368: You have the following Windows PowerShell output. (Exhibit) ...
- Question 369: Your role of Network Administrator at ABC.com includes the m...
- Question 370: Your network contains two servers named Server1 and Server2 ...
- Question 371: Your network contains an Active Directory domain named conto...
- Question 372: Your network contains a server named Server1 and 10 Web serv...
- Question 373: Note: This Question is part of series of question that use t...
- Question 374: Note: This question is part of a series of questions that us...
- Question 375: Your network contains an Active Directory domain named conto...
- Question 376: You work as a Network Administrator at ABC.com. The network ...
- Question 377: Your network contains an Active Directory domain named conto...
- Question 378: Your role of Network Administrator at ABC.com includes the m...
- Question 379: Your role of Network Administrator at ABC.com includes the m...
- Question 380: Your network contains one Active Directory domain named cont...
- Question 381: Your network contains two Hyper-V hosts named Host1 and Host...
- Question 382: Your role of Network Administrator at ABC.com includes the m...
- Question 383: You have a dns server named server1 that runs Windows Server...
- Question 384: Your network contains an Active Directory domain named conto...
- Question 385: An organization uses an Active Directory Rights Management S...
- Question 386: Note: This question is part of series of questions that use ...
- Question 387: Your network contains an Active Directory domain named conto...
- Question 388: Your network contains an Active Directory domain named conto...
- Question 389: Your role of Network Administrator at ABC.com includes the m...
- Question 390: You have a cluster named Cluster1 that contains two nodes. B...
- Question 391: Your network contains an Active Directory domain named conto...
- Question 392: Your network contains 25 Web servers that run Windows Server...
- Question 393: Your company is testing DirectAccess on Windows Server 2012 ...
- Question 394: You have five servers that run Windows Server 2012 R2. The s...
- Question 395: You have a server named Server1 that runs Windows Server 201...
- Question 396: You have two servers named Server1 and Server2 that run Wind...
- Question 397: Your network contains a single Active Directory domain named...
- Question 398: Your network contains an Active Directory domain named conto...
- Question 399: Your network contains an Active Directory domain named conto...
- Question 400: Which terminology is being described below? These trusts are...
- Question 401: You have a server named Server1 that has a Server Core insta...
- Question 402: Your role of Network Administrator at ABC.com includes the m...
- Question 403: Your manager has asked you to configure the company Windows ...
- Question 404: Your network contains an Active Directory domain named conto...
- Question 405: You have a server named Server1 that runs Windows Server 201...
- Question 406: Your network contains a perimeter network and an internal ne...
- Question 407: Your role of Network Administrator at ABC.com includes the m...
- Question 408: Your network contains an Active Directory domain named conto...
- Question 409: Your network contains an Active Directory domain named adatu...
- Question 410: Your role of Systems Administrator at ABC.com includes the m...
- Question 411: You have a DNS server named DNS1 that runs windows server 20...
- Question 412: You have a server named Server1. Server1 runs Windows Server...
- Question 413: You have a server named Server1 that runs Windows Server 201...
- Question 414: You have a server named Server1. You enable BitLocker Drive ...
- Question 415: Your network contains an active directory domain anmed conto...
- Question 416: Your network contains an Active Directory domain named conto...
- Question 417: Your network contains an Active Directory forest named conto...
- Question 418: Your network has ipsec policy configured. You need to exempt...
- Question 419: Your role of Network Administrator at ABC.com includes the m...
- Question 420: Your network contains an Active Directory domain named conto...
- Question 421: You work for a company named ABC.com. Your role of Network A...
- Question 422: Your network contains an Active Directory domain named conto...
- Question 423: Your IT company is constantly changing, with new users comin...
- Question 424: Your network contains an Active Directory domain named adatu...
- Question 425: You have two Windows Server Update Services (WSUS) servers n...
- Question 426: Your IT company has a large helpdesk department that deals w...
- Question 427: Your network contains an Active Directory domain named conto...
- Question 428: Note: This question is part of series of questions that use ...
- Question 429: Your network contains an Active Directory domain named conto...
- Question 430: Your network contains two Hyper-V hosts that run Windows Ser...
