- Home
- Linux Foundation
- Linux Foundation Certified Kubernetes Application Developer Exam
- LinuxFoundation.CKAD.v2025-11-17.q86
- Question 35
Valid CKAD Dumps shared by ExamDiscuss.com for Helping Passing CKAD Exam! ExamDiscuss.com now offer the newest CKAD exam dumps, the ExamDiscuss.com CKAD exam questions have been updated and answers have been corrected get the newest ExamDiscuss.com CKAD dumps with Test Engine here:
Access CKAD Dumps Premium Version
(193 Q&As Dumps, 35%OFF Special Discount Code: freecram)
<< Prev Question Next Question >>
Question 35/86
You have a microservice application that consists of two components: a web server (using Nginx) and a database (using PostgreSQL). The web server needs to access the database through a local connection, but due to network security restrictions, the web server cannot connect to the database directly. Describe how you can utilize a sidecar container to resolve this issue and ensure the database connection is secure.
Correct Answer:
See the solution below with Step by Step Explanation.
Explanation:
Solution (Step by Step) :
1. Create a Sidecar Container:
- Define a new container in your Deployment's 'spec-template-spec-containers' array, alongside the existing Nginx container. This new container will house the necessary tools for facilitating a secure database connection.
- Name this container appropriately, for example, 'database-proxy'
- Choose an image that contains the required software for database connection, such as 'postgres' or 'postgresqr
- Use a sidecar pattern in the Deployment YAML file. You can specify the sidecar in the container array in the Pod specification:
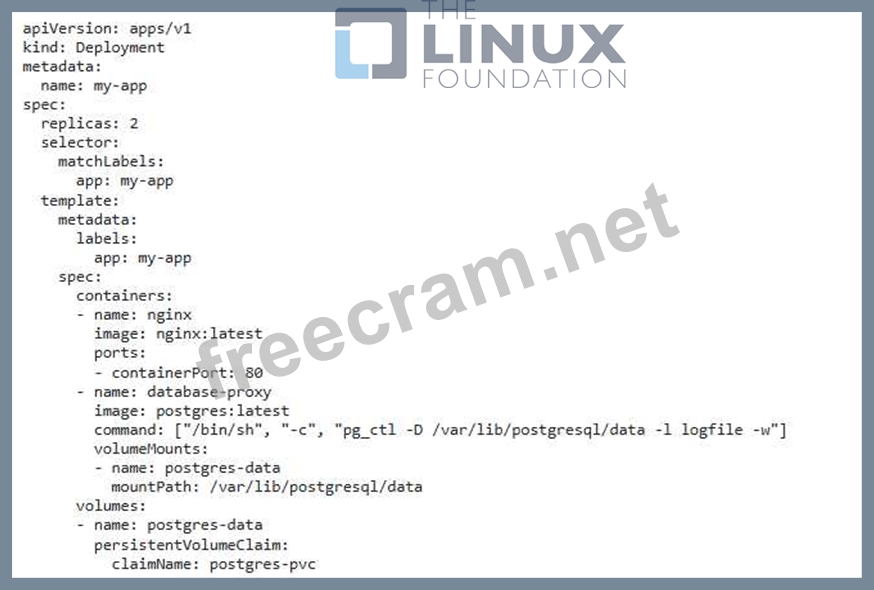
2. Database Connection Configuration: - Configure the sidecar container to connect to the database. - Establish a connection using the database user credentials and connection string. - If you use a secure connection, ensure that the certificates and private keys are accessible to the sidecar container. 3. Communication Between Containers: - Configure your web server container to communicate with the sidecar container. - Use environment variables to specify the hostname and port of the sidecar container, enabling the web server to connect to the database proxy within the pod. 4. Volume Sharing: - Optionally, share a volume between the web server and the sidecar container to facilitate shared data access, such as database configuration files. 5. Deploy the Deployment: - Apply the updated Deployment YAML file to your Kubernetes cluster using 'kubectl apply -f my-app.yaml' 6. Test the Application: - Access your web server application and confirm that it successfully connects to the database through the sidecar container.
Explanation:
Solution (Step by Step) :
1. Create a Sidecar Container:
- Define a new container in your Deployment's 'spec-template-spec-containers' array, alongside the existing Nginx container. This new container will house the necessary tools for facilitating a secure database connection.
- Name this container appropriately, for example, 'database-proxy'
- Choose an image that contains the required software for database connection, such as 'postgres' or 'postgresqr
- Use a sidecar pattern in the Deployment YAML file. You can specify the sidecar in the container array in the Pod specification:
2. Database Connection Configuration: - Configure the sidecar container to connect to the database. - Establish a connection using the database user credentials and connection string. - If you use a secure connection, ensure that the certificates and private keys are accessible to the sidecar container. 3. Communication Between Containers: - Configure your web server container to communicate with the sidecar container. - Use environment variables to specify the hostname and port of the sidecar container, enabling the web server to connect to the database proxy within the pod. 4. Volume Sharing: - Optionally, share a volume between the web server and the sidecar container to facilitate shared data access, such as database configuration files. 5. Deploy the Deployment: - Apply the updated Deployment YAML file to your Kubernetes cluster using 'kubectl apply -f my-app.yaml' 6. Test the Application: - Access your web server application and confirm that it successfully connects to the database through the sidecar container.


- Question List (86q)
- Question 1: You have a Deployment named 'my-app-deployment' running thre...
- Question 2: You are running a web application within a Kubernetes cluste...
- Question 3: You need to create a container image for an application that...
- Question 4: You are building a Kubernetes application that manages a fle...
- Question 5: You are building a web application with two microservices: a...
- Question 6: You are tasked with deploying a complex application using He...
- Question 7: You have a Node.js application that runs in a Kubernetes clu...
- Question 8: You have a Kustomization file that uses a resource patch to ...
- Question 9: You have a microservice application that is deployed as a De...
- Question 10: You have a Deployment named that runs 3 replicas of a Wordpr...
- Question 11: You're managing a Kubernetes cluster with various applicatio...
- Question 12: You have a web application that uses two different services:...
- Question 13: You nave a microservice tnat iS constantly updated With new ...
- Question 14: You have a web application that requires a specific sidecar ...
- Question 15: You need to implement a strategy to manage and control the a...
- Question 16: You have a statefulset named 'wordpress-statefulset' running...
- Question 17: You are building a container image for a Spring Boot applica...
- Question 18: You're developing a Kubernetes application that requires a c...
- Question 19: You have a Deployment named swordpress-deployment' running t...
- Question 20: You're building a containerized application that needs acces...
- Question 21: You have a Kubernetes deployment named 'wordpress-deployment...
- Question 22: You are building a microservice architecture for a new e-com...
- Question 23: You are working on a Kubernetes cluster where you have a Dep...
- Question 24: You are tasked with designing a multi-container Pod that run...
- Question 25: You are running a critical application in your Kubernetes cl...
- Question 26: You are working on a Kubernetes application that uses Kustom...
- Question 27: You have a Deployment named 'nginx-deployment' running 3 rep...
- Question 28: You have a Kustomization file that defines a Deployment with...
- Question 29: You have a Deployment named 'bookstore-deployment which depl...
- Question 30: You have a Kubernetes deployment tnat uses a ConfigMap to pr...
- Question 31: You have a Deployment named 'web-app-deployment that runs 5 ...
- Question 32: You're working on a Kubernetes application that involves ret...
- Question 33: You have a stateful application that requires persistent sto...
- Question 34: You are deploying a microservice application consisting of t...
- Question 35: You have a microservice application that consists of two com...
- Question 36: You are working on a Kubernetes application that requires a ...
- Question 37: You have a container image that contains a Python applicatio...
- Question 38: You are tasked with deploying an application with a deployme...
- Question 39: You are running a web application on a Kubernetes cluster, a...
- Question 40: You are building a microservices application on Kubernetes, ...
- Question 41: You have a Deployment running a container image for a web ap...
- Question 42: You have a Deployment named 'wordpress-deployment' that runs...
- Question 43: You have a microservices application where you need to route...
- Question 44: You have a Kubernetes cluster with a Deployment named 'my-ap...
- Question 45: You have a Deployment named 'my-app-deployment' that runs 3 ...
- Question 46: You have a Deployment named 'wordpress-deployment' that runs...
- Question 47: You have a Kubernetes Job that runs a Python script for data...
- Question 48: You're building a microservice architecture that uses a load...
- Question 49: You are deploying a new application named 'cnat-app' that re...
- Question 50: You are developing a service that uses a custom configuratio...
- Question 51: You have a Kubernetes application that requires configuratio...
- Question 52: You are creating a Deployment for a web application that use...
- Question 53: You have a Deployment that runs a critical service with 5 re...
- Question 54: You have a Kubernetes cluster with a deployment named 'myapp...
- Question 55: You have a Kubernetes cluster with a namespace called 'dev' ...
- Question 56: You have a microservice application that relies on a Redis c...
- Question 57: You have a Deployment named 'frontend-deployment that runs a...
- Question 58: You need to implement a mechanism for automatically rolling ...
- Question 59: You are running a multi-container application on Kubernetes,...
- Question 60: You have a Deployment named 'my-app' that runs 3 replicas of...
- Question 61: You need to configure a Kubemetes Deployment to use a servic...
- Question 62: You have an application that requires a TLS certificate for ...
- Question 63: You are running a web application on Kubernetes, and you nee...
- Question 64: You have a Deployment named 'web-app' running a containerize...
- Question 65: You need to design a mufti-container Pod that includes a mai...
- Question 66: You are deploying a microservice application that requires s...
- Question 67: You have a custom resource definition (CRD) named that repre...
- Question 68: You have a Kubernetes cluster with a Deployment named 'my-ap...
- Question 69: You have a Kubernetes cluster running a critical application...
- Question 70: You are running a critical application in Kubernetes tnat re...
- Question 71: You have a Deployment running with a specific image tag, and...
- Question 72: You have a stateful set named 'mysql-statefulset' that runs ...
- Question 73: You have a Spring Boot application that requires access to a...
- Question 74: You are running a web application with a backend service tha...
- Question 75: You have a Kubernetes application that uses a custom resourc...
- Question 76: You are tasked Witn designing a multi-container Pod tnat nos...
- Question 77: You are running a web application with multiple services exp...
- Question 78: You have a multi-container Pod that needs to perform some in...
- Question 79: You are building a container image for a Python application ...
- Question 80: You have a Kubernetes cluster running a critical application...
- Question 81: You are deploying a new application named 'streaming-service...
- Question 82: You are deploying a microservice that handles image processi...
- Question 83: You need to configure a PodSecurityPolicy to restrict tne ca...
- Question 84: You have a Deployment named 'web-apps that runs 3 replicas o...
- Question 85: You have a Kubernetes application that uses a Deployment nam...
- Question 86: You need to schedule a job to run every day at 10:00 AM to c...
