Valid AZ-104 Dumps shared by ExamDiscuss.com for Helping Passing AZ-104 Exam! ExamDiscuss.com now offer the newest AZ-104 exam dumps, the ExamDiscuss.com AZ-104 exam questions have been updated and answers have been corrected get the newest ExamDiscuss.com AZ-104 dumps with Test Engine here:
Access AZ-104 Dumps Premium Version
(428 Q&As Dumps, 35%OFF Special Discount Code: freecram)
<< Prev Question Next Question >>
Question 120/143
You have an Azure subscription that contains an Azure file share.
You have an on-premises server named Server1 that runs Windows Server 2016.
You plan to set up Azure File Sync between Server1 and the Azure file share.
You need to prepare the subscription for the planned Azure File Sync.
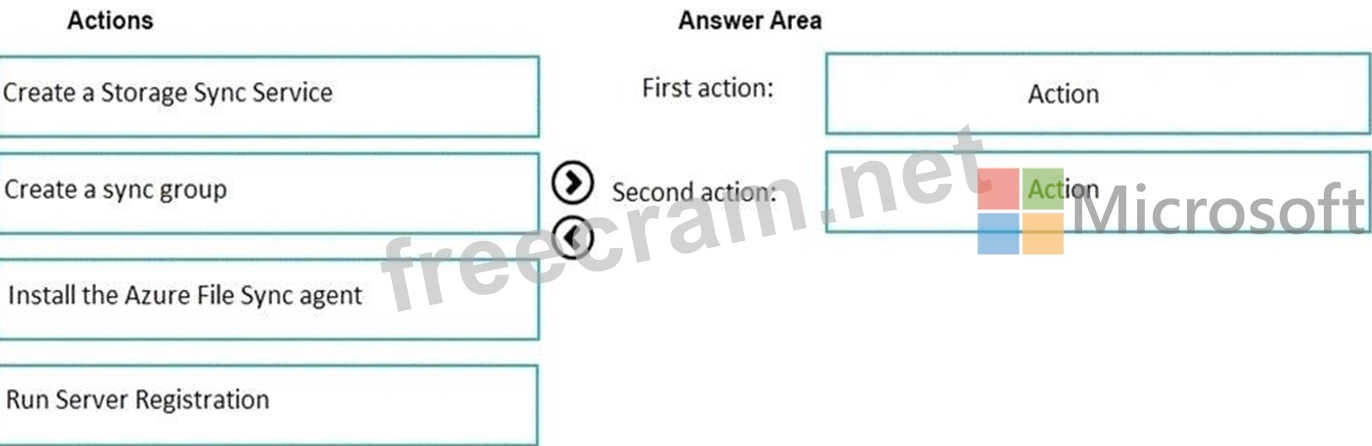
Which two actions should you perform in the Azure subscription? To answer, drag the appropriate actions to the correct targets. Each action may be used once, more than once, or not at all. You may need to drag the split bar between panes or scroll to view content.
You have an on-premises server named Server1 that runs Windows Server 2016.
You plan to set up Azure File Sync between Server1 and the Azure file share.
You need to prepare the subscription for the planned Azure File Sync.
Which two actions should you perform in the Azure subscription? To answer, drag the appropriate actions to the correct targets. Each action may be used once, more than once, or not at all. You may need to drag the split bar between panes or scroll to view content.
Correct Answer:
Explanation
As per the official MS doc:
The recommended steps to onboard on Azure File Sync for the first with zero downtime while preserving full file fidelity and access control list (ACL) are as follows:
1. Deploy a Storage Sync Service. --> This needs to be done on Azure .
2. Create a sync group. --> This needs to be done on Azure
3. Install Azure File Sync agent on the server with the full data set. --> This needs to be done on server1.
4. Register that server and create a server endpoint on the share. --> This needs to be done on server1.
5. Let sync do the full upload to the Azure file share (cloud endpoint).
6. After the initial upload is complete, install Azure File Sync agent on each of the remaining servers.
7. Create new file shares on each of the remaining servers.
8. Create server endpoints on new file shares with cloud tiering policy, if desired. (This step requires additional storage to be available for the initial setup.)
9. Let Azure File Sync agent do a rapid restore of the full namespace without the actual data transfer. After the full namespace sync, sync engine will fill the local disk space based on the cloud tiering policy for the server endpoint.
10. Ensure sync completes and test your topology as desired.
11. Redirect users and applications to this new share.
12. You can optionally delete any duplicate shares on the servers.
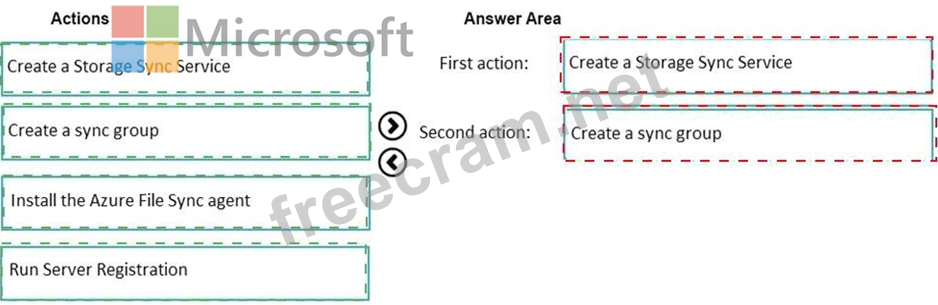
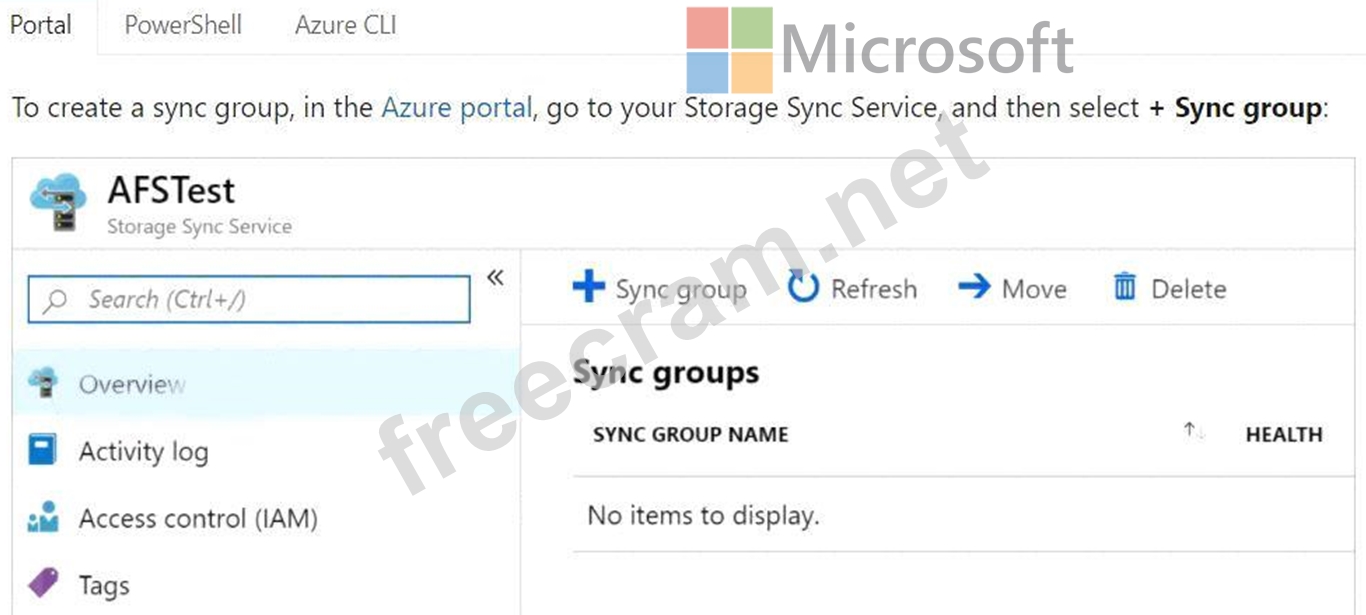
First action: Create a Storage Sync Service
The deployment of Azure File Sync starts with placing a Storage Sync Service resource into a resource group of your selected subscription.
Second action: Create a sync group
A sync group defines the sync topology for a set of files. Endpoints within a sync group are kept in sync with each other. A sync group must contain one cloud endpoint, which represents an Azure file share and one or more server endpoints. A server endpoint represents a path on a registered server. A server can have server endpoints in multiple sync groups. You can create as many sync groups as you need to appropriately describe your desired sync topology.
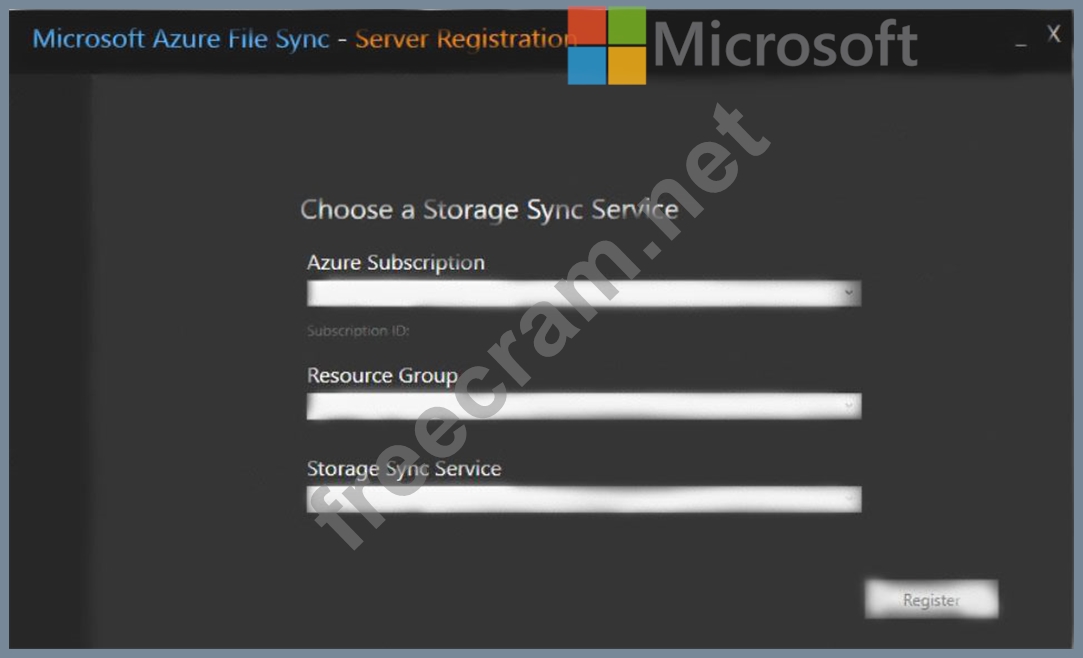
Third action: Run Server Registration
Registering your Windows Server with a Storage Sync Service establishes a trust relationship between your server (or cluster) and the Storage Sync Service. A server can only be registered to one Storage Sync Service and can sync with other servers and Azure file shares associated with the same Storage Sync Service. ) Reference:
https://docs.microsoft.com/en-us/azure/storage/files/storage-sync-files-deployment-guide?tabs=azure-portal


- Question List (143q)
- Question 1: You plan to deploy several Azure virtual machines that will ...
- Question 2: You have an Azure subscription. The subscription contains vi...
- Question 3: You have an Azure App Service plan named AdatumASP1 that hos...
- Question 4: You need to configure the Device settings to meet the techni...
- Question 5: You have two Azure virtual networks named VNet1 and VNet2. V...
- Question 6: You have 100 Azure subscriptions. All the subscriptions are ...
- Question 7: You have an Azure subscription named Subscription1 that cont...
- Question 8: You create the following resources in an subscription: * An ...
- Question 9: Note: This question is part of a series of questions that pr...
- Question 10: You have an Azure subscription that contains an Azure Storag...
- Question 11: You have an Azure Active Directory (Azure AD) tenant named a...
- Question 12: You plan to migrate an on-premises Hyper-V environment to Az...
- Question 13: You have an Azure web app named WebApp1 that runs in an Azur...
- Question 14: Note: This question is part of a series of questions that pr...
- Question 15: You are building a custom Azure function app to connect to A...
- Question 16: You have an Azure subscription that contains the resources s...
- Question 17: You deploy an Azure Kubernetes Service (AKS) cluster named C...
- Question 18: You have an existing Azure subscription that contains 10 vir...
- Question 19: You have an Azure subscription that contains the resources i...
- Question 20: Note: This question is part of a series of questions that pr...
- Question 21: You have an Azure Active Directory (Azure AD) tenant named c...
- Question 22: You have an Azure DNS zone named adatum.com. You need to del...
- Question 23: You have an Azure subscription named Subscription1. You have...
- Question 24: You have an Azure subscription. Users access the resources i...
- Question 25: From Azure Active Directory (AD) Privileged Identify Managem...
- Question 26: Your network contains an Active Directory domain. The domain...
- Question 27: You have an Azure subscription named Subscription1. Subscrip...
- Question 28: You need to meet the technical requirement for VM4. What sho...
- 1 commentQuestion 29: You need to use Azure Automation State Configuration to mana...
- Question 30: You have a sync group that has the endpoints shown in the fo...
- Question 31: You have an Azure Active Directory (Azure AD) tenant that ha...
- Question 32: You have an Azure Active Directory (Azure AD) tenant named C...
- Question 33: You have two Azure virtual machines named VM1 and VM2. You h...
- Question 34: You have an Azure subscription that contains the following s...
- Question 35: You have an Azure subscription named Subscription1. Subscrip...
- Question 36: You have an Azure subscription that contains the following u...
- Question 37: You have two Azure Active Directory (Azure AD) tenants named...
- Question 38: You plan to create a new Azure Active Directory (Azure AD) r...
- Question 39: You have an Azure subscription named Subscription1. You depl...
- Question 40: Which blade should you instruct the finance department audit...
- Question 41: You have an Azure subscription that contains the resource gr...
- Question 42: You have an on-premises server that contains a folder named ...
- Question 43: You have a deployment template named Template1 that is used ...
- Question 44: You have an Azure subscription named Subscription1 that cont...
- Question 45: You have an Azure subscription that contains an Azure Storag...
- Question 46: You have an Azure Active Directory (Azure AD) tenant named c...
- Question 47: You have the Azure virtual machines shown in the following t...
- Question 48: You create an Azure Storage account named contosostorage. Yo...
- Question 49: You have an Azure virtual machine named VM1 that runs Window...
- Question 50: You have an Azure subscription that contains the following r...
- Question 51: You have an Azure web app named WebApp1. You need to provide...
- Question 52: You have an Azure Linux virtual machine that is protected by...
- Question 53: You have an Azure Storage account named storage1. You plan t...
- Question 54: You deploy a load balancer that has the following configurat...
- Question 55: Note: This question is part of a series of questions that pr...
- Question 56: VM1 is running and connects to NIC1 and Disk1. NIC1 connects...
- Question 57: You have an Azure subscription that is used by four departme...
- Question 58: You are evaluating the connectivity between the virtual mach...
- Question 59: You have the Azure management groups shown in the following ...
- Question 60: Note: This question is part of a series of questions that pr...
- Question 61: You have an Azure subscription that contains the virtual mac...
- Question 62: You have an Azure subscription that contains an Azure Storag...
- Question 63: You need to identify the storage requirements for Contoso. F...
- Question 64: You have an Azure Active Directory (Azure AD) tenant. All ad...
- Question 65: You need to resolve the licensing issue before you attempt t...
- Question 66: You have an Azure Active Directory (Azure AD) tenant. You ne...
- Question 67: You have an Azure subscription named Subscription1. Subscrip...
- Question 68: You have an Azure subscription that contains a resource grou...
- Question 69: Note: This question is part of a series of questions that pr...
- Question 70: You have an Azure subscription named Subscription1. You have...
- Question 71: You have an Azure subscription. You have 100 Azure virtual m...
- Question 72: You enable password reset for contoso.onmicrosoft.com as sho...
- Question 73: Note: This question is part of a series of questions that pr...
- Question 74: Note: This question is part of a series of questions that pr...
- Question 75: You have an Azure subscription named Subscription1 that has ...
- Question 76: You have an Azure Subscription named Subcription1.has Subcri...
- Question 77: You have Azure subscription that includes following Azure fi...
- Question 78: Note: This question is part of a series of questions that pr...
- Question 79: You have an Azure resource manager template that will be use...
- Question 80: You have an Azure subscription that has a Recovery Services ...
- Question 81: Your company registers a domain name of contoso.com. You cre...
- Question 82: You have an Azure virtual machine named VM1. The network int...
- Question 83: You have an Azure virtual machine named VM1. Azure collects ...
- Question 84: You have an Azure subscription named Subscroption1. In Subsc...
- Question 85: You have the App Service plans shown in the following table....
- Question 86: You have an Azure subscription that contains three virtual n...
- Question 87: You have a hybrid deployment of Azure Active Directory (Azur...
- Question 88: You have Azure subscriptions named Subscription1 and Subscri...
- Question 89: Note: This question is part of a series of questions that pr...
- Question 90: You are planning the move of App1 to Azure. You create a net...
- Question 91: You plan to create an Azure Storage account in the Azure reg...
- Question 92: You have an Azure subscription that contains a virtual netwo...
- Question 93: You have five Azure virtual machines that run Windows Server...
- Question 94: You create an App Service plan named App1 and an Azure web a...
- Question 95: You plan to use the Azure Import/Export service to copy file...
- Question 96: Note: This question is part of a series of questions that pr...
- Question 97: You have an Azure subscription that contains a virtual netwo...
- Question 98: Note: This question is part of a series of questions that pr...
- Question 99: You have Azure virtual machines that run Windows Server 2019...
- Question 100: You have an on-premises network that includes a Microsoft SQ...
- Question 101: You have an Azure subscription that contains a virtual machi...
- Question 102: You have an Azure subscription named Subscription1. Subscrip...
- Question 103: You are the global administrator for an Azure Active Directo...
- Question 104: You deploy an Azure Kubernetes Service (AKS) cluster that ha...
- Question 105: You have an Azure subscription that contains a user account ...
- Question 106: You have an Azure web app named App1. App1 has the deploymen...
- Question 107: Note: This question is part of a series of questions that pr...
- Question 108: You have an Azure virtual network named VNet1 that contains ...
- Question 109: You have an Azure virtual machine named VM1. The network int...
- Question 110: You have two Azure virtual machines named VM1 and VM2. VM1 h...
- Question 111: You have an availability set named AS1 that contains three v...
- Question 112: You need to recommend a solution to automate the configurati...
- Question 113: You have an Azure subscription that contains an Azure Servic...
- Question 114: You have an Azure subscription that contains the resources s...
- Question 115: Note: This question is part of a series of questions that pr...
- Question 116: You have an Azure policy as shown in the following exhibit. ...
- Question 117: You have an Azure subscription that contains the resources s...
- Question 118: You need to prepare the environment to meet the authenticati...
- Question 119: You plan to create an Azure virtual machine named VM1 that w...
- Question 120: You have an Azure subscription that contains an Azure file s...
- Question 121: You are configuring Azure Active Directory (AD) Privileged I...
- Question 122: You download an Azure Resource Manager template based on an ...
- Question 123: You have a Microsoft SQL Server Always On availability group...
- Question 124: Note: This question is part of a series of questions that pr...
- Question 125: You have an Azure subscription that contains an Azure Storag...
- Question 126: You have an Azure subscription named Subscription1 that cont...
- Question 127: Note: This question is part of a series of questions that pr...
- Question 128: Your company has an Azure subscription named Subscription1. ...
- Question 129: You manage two Azure subscriptions named Subscription1 and S...
- Question 130: You have an Azure subscription that contains the public load...
- Question 131: You have an Azure virtual network named VNet1 that connects ...
- Question 132: Note: This question is part of a series of questions that pr...
- Question 133: You are configuring serverless computing in Azure. You need ...
- Question 134: A web developer creates a web application that you plan to d...
- Question 135: You create an Azure VM named VM1 that runs Windows Server 20...
- Question 136: You create a Recovery Services vault backup policy named Pol...
- Question 137: You have an on premises data center and an Azure subscriptio...
- Question 138: You have an Azure virtual machine named VM1 that runs Window...
- Question 139: You have an Azure subscription that contains a policy-based ...
- Question 140: You have an Azure subscription that contains 100 virtual mac...
- Question 141: You need to define a custom domain name for Azure AD to supp...
- Question 142: You need to prepare the environment to meet the authenticati...
- Question 143: You have an Azure subscription named Subscription1 that cont...
