- Home
- Microsoft
- Installing and Configuring Windows Server 2012
- Microsoft.70-410.v2018-05-05.q200
- Question 55
Valid 70-410 Dumps shared by ExamDiscuss.com for Helping Passing 70-410 Exam! ExamDiscuss.com now offer the newest 70-410 exam dumps, the ExamDiscuss.com 70-410 exam questions have been updated and answers have been corrected get the newest ExamDiscuss.com 70-410 dumps with Test Engine here:
Access 70-410 Dumps Premium Version
(498 Q&As Dumps, 35%OFF Special Discount Code: freecram)
<< Prev Question Next Question >>
Question 55/200
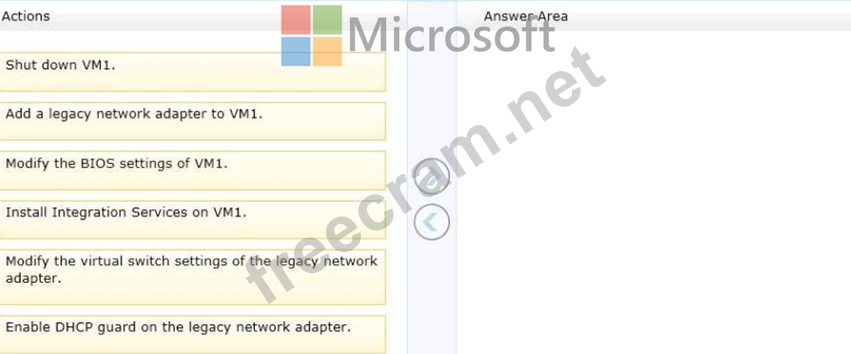
DRAG DROP
You have a Hyper-V host named Server1. A technician creates a virtual machine named VM1 on Server1 by using the New Virtual Machine Wizard.
You start VM1 and you discover that there is no option to start by using PXE.
You need to ensure that you can start VM1 by using PXE.
Which three actions should you perform in sequence? (To answer, move the appropriate three actions from the list of actions to the answer area and arrange them in the correct order.)
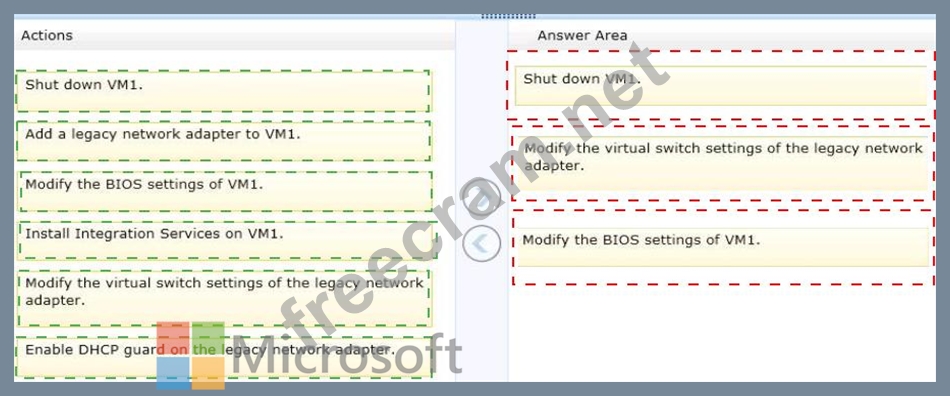
Correct Answer:
Explanation:
Box 1: Shut down VM1.
Box 2: Modify the virtual switch settings of the legacy network adapter.
Box 3: Modify the BIOS settings of VM1.
Note:
Step 1: The VM need to be shutdown first.
Step 2:
1. You need to create a virtual switch. This is needed for the Virtual Machine to be able to communicate with the network. If you already have created a virtual machine for your network, you can skip this step. Start by right-clicking the Hyper-V host in Hyper-V Manager and selecting "Virtual Switch Manager".
2. Create a new Virtual Switch. Select "External", which is similar to "Bridged" if you're used to other virtualization software.
3. Give the new Virtual Switch a name.
4. By default, there is only a "Standard Network Adapter" installed on the Virtual Machine, but for PXE functionality you will need to add a "Legacy Network Adapter".
5 . Go to the "Legacy Network Adapter" that you just added and specify that it should use the Virtual Switch that you just created.
Step 3: you should change the BIOS boot priority to make sure that the Virtual Machine always tries to boot first using the "Legacy Network Adapter". Just select the "Legacy Network Adapter" and move it to the top using the buttons.
Step 4: Start your Virtual Machine and now PXE boot should work.


- Question List (200q)
- Question 1: Your network contains an Active Directory domain named conto...
- Question 2: HOTSPOT Your network contains an Active Directory domain nam...
- Question 3: Your network contains three servers that run Windows Server ...
- Question 4: You work as an administrator at Contoso.com. The Contoso.com...
- Question 5: You perform a Server Core Installation of window Server 2012...
- Question 6: You have a file server named Server1 that runs Windows Serve...
- Question 7: Your network contains a Hyper-V host named Server1 that runs...
- Question 8: Your network contains an Active Directory domain named conto...
- Question 9: You work as an administrator at Contoso.com. The Contoso.com...
- Question 10: You work as an administrator at Contoso.com. The Contoso.com...
- Question 11: Your network contains an Active Directory domain named conto...
- Question 12: HOTSPOT Your network contains an Active Directory domain nam...
- Question 13: HOTSPOT Your network contains an Active Directory domain nam...
- Question 14: Your network contains an Active Directory forest. The forest...
- Question 15: You have a server named Server1 that has the Print and Docum...
- Question 16: Your network contains an Active Directory domain named conto...
- Question 17: You have a server named Server1 that runs Windows Server 201...
- Question 18: Your network contains an Active Directory domain named conto...
- Question 19: Your network contains an Active Directory domain named adatu...
- Question 20: Your network contains an Active Directory domain named conto...
- Question 21: You work as an administrator at Contoso.com. The Contoso.com...
- Question 22: Your network contains an Active Directory domain named adatu...
- Question 23: Your company has a remote office that contains 1,600 client ...
- Question 24: You have a server named Server1 that runs Windows Server 201...
- Question 25: Your network contains an Active Directory domain named conto...
- Question 26: Your network contains an Active Directory domain named conto...
- Question 27: You have a server named Server1 that runs a Server Core inst...
- Question 28: DRAG DROP You have a Hyper-V host named Host1.Host1 contains...
- Question 29: A company has a forest with 4 sites. Subnets are as follows:...
- Question 30: You perform a Server Core Installation of Windows Server 201...
- Question 31: Your company has a main office and four branch offices. The ...
- Question 32: You have a print server named Server1. You install a printer...
- Question 33: You work as an administrator at Contoso.com. The Contoso.com...
- Question 34: Your network contains an Active Directory domain named adatu...
- Question 35: HOTSPOT You have a Hyper-V host named Server1 that runs Wind...
- Question 36: You have two servers named Server1 and Server2. Both servers...
- Question 37: HOTSPOT You have a server named Server1. Server1 runs Window...
- Question 38: Your company has a main office and two branch offices. The o...
- Question 39: Your network contains an Active Directory domain named conto...
- Question 40: Your network contains an Active Directory domain named conto...
- Question 41: Your network contains an Active Directory domain named conto...
- Question 42: You are configuring the IPv6 network infrastructure for a br...
- Question 43: Your network contains an Active Directory domain named adatu...
- Question 44: You work as an administrator at Contoso.com. The Contoso.com...
- Question 45: Your network contains an Active Directory domain named conto...
- Question 46: Your network contains an Active Directory domain named conto...
- Question 47: You work as an administrator at Contoso.com. The Contoso.com...
- Question 48: Your network contains an Active Directory domain named conto...
- Question 49: Your network contains an Active Directory forest named conto...
- Question 50: Your network contains an Active Directory forest. The forest...
- Question 51: You have a domain controller named Server1 that runs Windows...
- Question 52: HOTSPOT Your company has a main office and a sales office. T...
- Question 53: Your network contains an Active Directory domain named conto...
- Question 54: Your network contains an Active Directory domain named conto...
- Question 55: DRAG DROP You have a Hyper-V host named Server1. A technicia...
- Question 56: You have a server named Server1 that runs Windows Server 201...
- Question 57: Your network contains an Active Directory domain named adatu...
- Question 58: You work as a senior administrator at Contoso.com. The Conto...
- Question 59: You work as an administrator at Contoso.com. The Contoso.com...
- Question 60: Your network contains an Active Directory forest named conto...
- Question 61: Which of the following group scope modifications are never p...
- Question 62: HOTSPOT You have a server named Server1. Server1 runs Window...
- Question 63: Your network contains an Active Directory domain named conto...
- Question 64: Your network contains a server named Server1 and 10 Web serv...
- Question 65: Your network contains an Active Directory domain named conto...
- Question 66: Your network contains an Active Directory domain named conto...
- Question 67: DRAG DROP Your network contains an Active Directory domain n...
- Question 68: You perform a Server Core Installation of Windows Server 201...
- Question 69: Your network contains an Active Directory domain named conto...
- Question 70: Your network contains an Active Directory domain named conto...
- Question 71: Your network contains an Active Directory domain named conto...
- Question 72: Which of the following are the two built-in user accounts cr...
- Question 73: Which of the following groups do you use to consolidate grou...
- Question 74: Your network contains a server named Server1 that runs Windo...
- Question 75: DRAG DROP You plan to deploy a DHCP server that will support...
- Question 76: HOTSPOT You plan to upgrade all servers to Windowns Server 2...
- Question 77: Your network contains an Active Directory domain named conto...
- Question 78: Your network contains a file server named Server1 that runs ...
- Question 79: Your network contains an Active Directory domain named conto...
- Question 80: A company's network administrator needs to ensure a specific...
- Question 81: You have a server named Server1 that runs Windows Server 201...
- Question 82: You plan to deploy a file server to a temporary location. Th...
- Question 83: You work as a senior administrator at Contoso.com. The Conto...
- Question 84: DRAG DROP You have a server named Server1.Server1 runs Windo...
- Question 85: Your network contains an Active Directory domain named conto...
- Question 86: You have an existing Active Directory site named Site1. You ...
- Question 87: You have a server named Server1 that runs a full installatio...
- Question 88: HOTSPOT Your network contains an Active Directory domain nam...
- Question 89: Your network contains an Active Directory domain named adatu...
- Question 90: You have a server named Server1 that runs Windows Server 201...
- Question 91: Your network contains a production Active Directory forest n...
- Question 92: You have a server named Server1 that runs Windows Server 201...
- Question 93: HOTSPOT Your network contains one Active Directory forest na...
- Question 94: You work as an administrator at Contoso.com. The Contoso.com...
- Question 95: Your network contains an Active Directory domain named conto...
- Question 96: Your network contains three servers that run Windows Server ...
- Question 97: You have 10 domain controller in a domain. You need to preve...
- Question 98: HOTSPOT You have a Hyper-V host named Hyperv1 that runs Wind...
- Question 99: Your network contains an Active Directory domain named adatu...
- Question 100: Your network contains an Active Directory domain named conto...
- Question 101: Your network contains an Active Directory domain named conto...
- Question 102: You have a server that runs Windows Server 2012 R2. The serv...
- Question 103: You have a server named Server1 that runs a Server Core Inst...
- Question 104: Your network contains an Active Directory forest named conto...
- Question 105: Your network contains an Active Directory domain named conto...
- Question 106: You have a print server named Server1 that runs Windows Serv...
- Question 107: Your network contains an Active Directory domain named conto...
- Question 108: You work as an administrator at Contoso.com. The Contoso.com...
- Question 109: DRAG DROP Your network contains an Active Directory domain n...
- Question 110: Your network contains two servers named Server1 and Server2 ...
- Question 111: You have a server named Server1 that runs Windows Server 201...
- Question 112: You work as a senior administrator at Contoso.com. The Conto...
- Question 113: Your network contains multiple subnets. On one of the subnet...
- Question 114: Your network contains a server named Server1 that runs Windo...
- Question 115: Your network contains a server named Server1 that runs Windo...
- Question 116: Your network contains multiple subnets. On one of the subnet...
- Question 117: HOTSPOT You have a DNS server named Server1. Server1 runs Wi...
- Question 118: Your network contains an Active Directory domain named conto...
- Question 119: HOTSPOT Your network contains two Active Directory forests n...
- Question 120: You have a server named Server1 that runs Windows Server 201...
- Question 121: Your network contains an Active Directory domain named conto...
- Question 122: Your network contains an Active Directory domain named conto...
- Question 123: You work as an administrator at Contoso.com. The Contoso.com...
- Question 124: You have a server named Server1 that runs a Server Core inst...
- Question 125: Your network contains an Active Directory forest that contai...
- Question 126: You work as an administrator at ABC.com. The ABC.com network...
- Question 127: Your network contains an Active Directory domain named adatu...
- Question 128: HOTSPOT Your network contains one Active Directory forest na...
- Question 129: How can you manage a newly installed Windows Server 2012 R2 ...
- Question 130: Your network contains an Active Directory forest named conto...
- Question 131: HOTSPOT You have two servers that run Windows Server 2012 R2...
- Question 132: Your network contains an Active Directory domain named conto...
- Question 133: Your network contains an Active Directory domain named conto...
- Question 134: Your network contains an Active Directory domain named conto...
- Question 135: HOTSPOT Your network contains an Active Directory domain nam...
- Question 136: You have a virtual machine named VM1. You install Windows Se...
- Question 137: You have a server named Data1 that runs a Server Core Instal...
- Question 138: HOTSPOT You have a DNS server named Server 1. Server1 runs W...
- Question 139: You work as a senior administrator at Contoso.com. The Conto...
- Question 140: Your network contains an Active Directory domain named conto...
- Question 141: HOTSPOT You have a file server named Server1 that runs Windo...
- Question 142: Your network contains two Hyper-V hosts named Host1 and Host...
- Question 143: HOTSPOT Your network contains an Active Directory domain nam...
- Question 144: Your network contains an Active Directory domain named conto...
- Question 145: You work as a senior administrator at Contoso.com. The Conto...
- Question 146: You work as a senior administrator at Contoso.com. The Conto...
- Question 147: A laptop with server 2012 R2 OS, you need to ensure that ser...
- Question 148: You have a server named Server1. Server1 runs Windows Server...
- Question 149: You work as an administrator at Contoso.com. The Contoso.com...
- Question 150: Your network contains an Active Directory domain named conto...
- Question 151: You have a server named Server1. Server1 runs a Server Core ...
- Question 152: Your network contains an Active Directory domain named conto...
- Question 153: Your network contains an Active Directory domain named conto...
- Question 154: Your network contains two Active Directory forests named con...
- Question 155: Your network contains an Active Directory domain named conto...
- Question 156: You have a server named Server1 that runs Windows Server 201...
- Question 157: You work as an administrator at Contoso.com. The Contoso.com...
- Question 158: Your network contains two servers named Server1 and Server2 ...
- Question 159: Your network contains an Active Directory domain named conto...
- Question 160: Your network contains an Active Directory domain named conto...
- Question 161: Your network contains an Active Directory domain named conto...
- Question 162: You have a server that runs Windows Server 2012 R2. You need...
- Question 163: Your network contains an Active Directory domain named conto...
- Question 164: HOTSPOT Your network contains an Active Directory domain nam...
- Question 165: You have a server named Server1. Server1 runs Windows Server...
- Question 166: Your company's security policy states that all of the server...
- Question 167: You have a print server named Print1 that runs Windows Serve...
- Question 168: You have a server named Server1 that runs Windows Server 201...
- Question 169: Your network contains an Active Directory domain named conto...
- Question 170: Your network contains an Active Directory domain named conto...
- Question 171: DRAG DROP You are configuring a multi-subnet IPv6 network fo...
- Question 172: Your network contains an Active Directory domain named conto...
- Question 173: Your network contains one Active Directory forest named cont...
- Question 174: Your network contains an Active Directory forest named conto...
- Question 175: HOTSPOT Your network contains an Active Directory domain nam...
- Question 176: You have a server named Server2 that runs Windows Server 201...
- Question 177: Your network contains one Active Directory domain named cont...
- Question 178: Your network contains an Active Directory domain named conto...
- Question 179: Your network contains an Active Directory domain named conto...
- Question 180: HOTSPOT Your network contains a subnet named Subnet1. Subnet...
- Question 181: You install Windows Server 2012 R2 on a standalone server na...
- Question 182: You work as a senior administrator at Contoso.com. The Conto...
- Question 183: You work as an administrator at Contoso.com. The Contoso.com...
- Question 184: HOTSPOT Your network contains an Active Directory domain nam...
- Question 185: Your network contains an Active Directory domain named conto...
- Question 186: HOTSPOT Your network contains an Active Directory domain nam...
- Question 187: Your network contains an Active Directory domain named conto...
- Question 188: Your network contains an Active Directory domain named conto...
- Question 189: You work as an administrator at Contoso.com. The Contoso.com...
- Question 190: HOTSPOT Your network contains an Active Directory domain nam...
- Question 191: Your network contains an Active Directory domain named conto...
- Question 192: You have a server named Server1 that runs Windows Server 201...
- Question 193: Your network contains an Active Directory domain named adatu...
- Question 194: You have an Active Directory domain named contoso.com. You h...
- Question 195: HOTSPOT You have a print server named Server1 that runs Wind...
- Question 196: Your network contains an Active Directory domain named conto...
- Question 197: Your network contains an Active Directory domain named conto...
- Question 198: Your network contains an Active Directory domain named conto...
- Question 199: Your network contains an Active Directory domain named conto...
- Question 200: Your network contains an Active Directory domain named conto...
