Valid 70-347 Dumps shared by ExamDiscuss.com for Helping Passing 70-347 Exam! ExamDiscuss.com now offer the newest 70-347 exam dumps, the ExamDiscuss.com 70-347 exam questions have been updated and answers have been corrected get the newest ExamDiscuss.com 70-347 dumps with Test Engine here:
Access 70-347 Dumps Premium Version
(315 Q&As Dumps, 35%OFF Special Discount Code: freecram)
<< Prev Question Next Question >>
Question 137/210
DRAG DROP
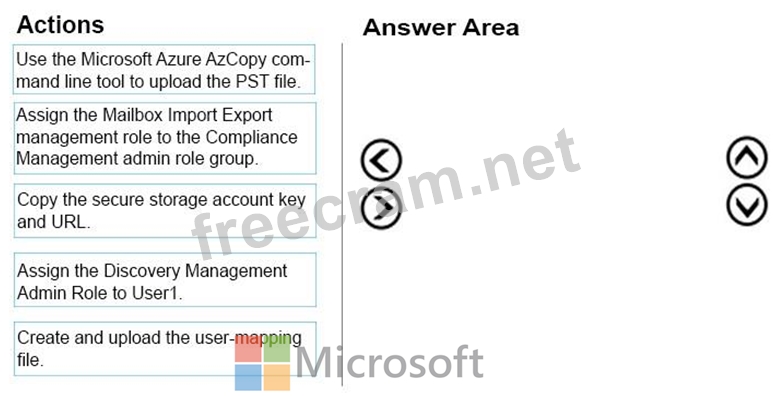
You are the administrator for an Office 365 tenant. All employees have Exchange Online mailboxes. You have a user named User1 that is a member of the Compliance Management admin role group.
User1 needs to move all data from local PST files into Exchange Online.
Which four actions should you perform in sequence?
To answer, move the appropriate actions from the list of actions to the answer area and arrange them in the correct order.
Select and Place:
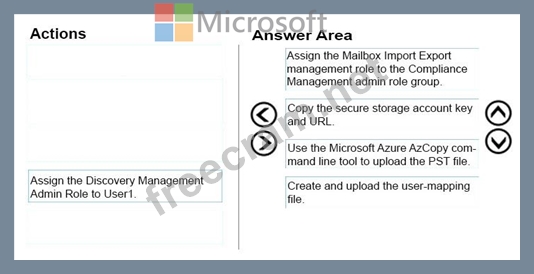
Correct Answer:
Explanation/Reference:
Explanation:
Box 1:
Prerequisite: You have to be assigned the Mailbox Import Export role to import PST files to Office 365 mailboxes.
Box 2:
Step 1: Copy the SAS URL and install Azure AzCopy
Box 3:
Step 2: Upload your PST files to Office 365
Open a Command Prompt on your local computer.

Go to the directory where you installed the AzCopy.exe tool in Step 1. If you installed the tool in the
default location, go to %ProgramFiles(x86)%\Microsoft SDKs\Azure\AzCopy.
Run the following command to upload the PST files to Office 365.AzCopy.exe /Source:<Location of
PST files> /Dest:<SAS URL> /V:<Log file location>
Box 4:
Step 3: Create the PST Import mapping file
After the PST files have been uploaded to the Azure storage location for your Office 365 organization, the next step is to create a comma separated value (CSV) file that specifies which user mailboxes the PST files will be imported to.
You will submit this CSV file in the next step when you create a PST Import job.
1. Download a copy of the PST Import mapping file.
2. Open or save the CSV file to your local computer. The following example shows a completed PST Import mapping file (opened in NotePad). It's much easier to use Microsoft Excel to edit the CSV file.
Example file:
Workload,FilePath,Name,Mailbox,IsArchive,TargetRootFolder,SPFileContainer,SPManifestContainer,SPSi teUrl Exchange,,annb.pst,[email protected],FALSE,/Inbox,,, Exchange,,annb_archive.pst,[email protected],TRUE,/Inbox,,, Etc.
References: https://support.office.com/en-us/article/Use-network-upload-to-import-PST-files-to-Office-365-
103f940c-0468-4e1a-b527-cc8ad13a5ea6


- Question List (210q)
- Question 1: Contoso, Ltd. has an Office 365 Enterprise E3 plan. Contoso ...
- Question 2: Overview Fabrikam, Inc. is a medical billing clearing house ...
- Question 3: You are the Office 365 administrator for your company. The c...
- Question 4: Your company has an Office 365 Enterprise E1 subscription. T...
- 1 commentQuestion 5: Your company uses Office 365 and has an Enterprise E3 plan. ...
- Question 6: DRAG DROP You are the Office 365 administrator for a company...
- Question 7: HOTSPOT You are the Microsoft Exchange Online administrator ...
- Question 8: Overview General Overview Contoso, Ltd. is a manufacturing c...
- Question 9: Overview General Overview Contoso, Ltd. is a manufacturing c...
- Question 10: You manage an Office 365 tenant with an Enterprise E3 subscr...
- Question 11: DRAG DROP You are a Microsoft SharePoint administrator for C...
- Question 12: An organization has an on-premises Exchange 2010 organizatio...
- Question 13: In this section, you will see one or more sets of questions ...
- Question 14: You are the Office 365 administrator for Contoso, Ltd. Some ...
- Question 15: DRAG DROP You are the Office 365 administrator for your comp...
- Question 16: DRAG DROP You are the Office 365 administrator for your comp...
- Question 17: DRAG DROP Your company has an Office 365 subscription and us...
- Question 18: DRAG DROP A company has an Office 365 tenant. All employee m...
- Question 19: You are the Office 365 administrator for your company. Many ...
- Question 20: DRAG DROP Your company uses Office 365 and Microsoft SharePo...
- Question 21: You are responsible for managing Office 365 for your custome...
- Question 22: You manage an Office 365 tenant that uses an Enterprise E1 s...
- Question 23: Your company uses Microsoft Exchange Online and Microsoft Sk...
- Question 24: DRAG DROP You are the Office 365 administrator at a large re...
- Question 25: You administer Microsoft Exchange Online for Fabrikam, Inc. ...
- Question 26: HOTSPOT Contoso, Ltd., has an Office 365 tenant. All employe...
- Question 27: You are the Office 365 administrator for your company. The c...
- Question 28: Overview General Overview Contoso, Ltd. is a manufacturing c...
- Question 29: Your company uses Office 365 and has an Enterprise E3 licens...
- Question 30: You need to migrate a Microsoft Exchange Server 2007 organiz...
- Question 31: You deploy Office 365. All the members of a team named Sales...
- Question 32: Note: This question is part of a series of questions that pr...
- Question 33: Your company uses Microsoft Exchange Online and Microsoft Ly...
- Question 34: You are the Office 365 administrator for your company. All u...
- Question 35: DRAG DROP An organization has an on-premises Exchange 2010 s...
- Question 36: You manage a Microsoft SharePoint Online deployment. You cre...
- Question 37: You are the Office 365 administrator for your company. The c...
- Question 38: You plan to implement a collaboration platform for a company...
- Question 39: Your company has an Office 365 subscription. A user named Te...
- Question 40: You are the Office 365 administrator for your company. The c...
- Question 41: You manage a Microsoft SharePoint Online tenant that has coa...
- Question 42: In this section, you will see one or more sets of questions ...
- Question 43: HOTSPOT You have an Office 365 subscription that has a site ...
- Question 44: You are the Office 365 administrator for your company. The c...
- Question 45: You are an Office 365 administrator for Contoso, Ltd. Contos...
- Question 46: HOTSPOT You are the Office 365 administrator for your compan...
- Question 47: Overview General Overview Contoso, Ltd. is a manufacturing c...
- Question 48: HOTSPOT Your company has an Office 365 subscription and uses...
- Question 49: DRAG DROP You have an existing Office 365 subscription. User...
- Question 50: DRAG DROP You are the Office 365 administrator for your comp...
- Question 51: DRAG DROP You are deploying Office 365 for your organization...
- Question 52: DRAG DROP An organization has an on-premises Exchange 2016 s...
- Question 53: You have an Office 365 subscription. A new compliance policy...
- Question 54: DRAG DROP Your company, Coho Vineyard, uses Microsoft Exchan...
- Question 55: DRAG DROP You are the Office 365 administrator for your comp...
- Question 56: Overview Fabrikam, Inc. is a medical billing clearing house ...
- Question 57: HOTSPOT Your company uses Office 365 Small Business. You nee...
- Question 58: DRAG DROP An organization has an on-premises Exchange organi...
- Question 59: You are the SharePoint administrator for a company's SharePo...
- Question 60: HOTSPOT You are the Office 365 administrator for your compan...
- Question 61: Your company has a Microsoft Exchange Server 2010 Service Pa...
- Question 62: DRAG DROP Your company has an Office 365 subscription and us...
- Question 63: HOTSPOT You are the Microsoft Lync Online administrator for ...
- Question 64: Your company deploys Microsoft Lync Online. You deploy the M...
- Question 65: DRAG DROP You are an Office 365 migration consultant. Your c...
- Question 66: DRAG DROP Your company has an Office 365 subscription and us...
- Question 67: Your company plans to use Office 365 and Microsoft SharePoin...
- Question 68: You administer Microsoft Exchange Online for Fabrikam, Inc. ...
- Question 69: An organization has an Office 365 tenant and uses an Enterpr...
- Question 70: A company uses Skype for Business Online. You use contoso.co...
- Question 71: You are an Office 365 administrator for Contoso, Ltd. Contos...
- Question 72: You are the Office 365 administrator for your company. You n...
- Question 73: HOTSPOT You are the Exchange Online administrator for a comp...
- Question 74: HOTSPOT You are the Office 365 administrator for an organiza...
- Question 75: You are the Office 365 administrator for your company. You n...
- Question 76: Your company uses Microsoft SharePoint Online for collaborat...
- Question 77: DRAG DROP You are the Office 365 administrator for your comp...
- Question 78: Note: This question is part of a series of questions that pr...
- Question 79: HOTSPOT You are the Office 365 administrator for Contoso, Lt...
- Question 80: Your company hires a new human resources consultant. Corpora...
- Question 81: You manage a Microsoft Exchange server that is on an isolate...
- Question 82: HOTSPOT Your company uses Microsoft SharePoint Online. You s...
- Question 83: DRAG DROP You are the Office 365 administrator for your comp...
- Question 84: You are the Office 365 Administrator for your company. You m...
- Question 85: In this section, you will see one or more sets of questions ...
- Question 86: Сontoso, Ltd. has a SharePoint Online tenant and uses an Of...
- Question 87: Your company is planning to migrate to Microsoft Exchange On...
- Question 88: Note: This question is part of a series of questions that us...
- Question 89: You are the Office 365 administrator for your company. The c...
- Question 90: Your company has a hybrid deployment of Office 365. You need...
- Question 91: You manage an Office 365 tenant that uses SharePoint Online....
- Question 92: HOTSPOT You are the Office 365 administrator for your compan...
- Question 93: DRAG DROP An organization has a single Exchange 2016 server....
- Question 94: HOTSPOT A company has an on-premises deployment of Microsoft...
- Question 95: DRAG DROP You have three customers named Customer1, Customer...
- Question 96: DRAG DROP You are the Office 365 administrator for a company...
- Question 97: DRAG DROP You are the Office 365 administrator for your comp...
- Question 98: DRAG DROP An organization has an Office 365 tenant that uses...
- Question 99: Your company has an Office 365 Small Business subscription. ...
- Question 100: HOTSPOT You are the SharePoint Online administrator for Cont...
- Question 101: You are the Office 365 administrator for your company. The c...
- Question 102: An organization has an Office 365 tenant and uses an Enterpr...
- Question 103: You are the Office 365 administrator for your company. The c...
- Question 104: You are the Office 365 administrator for your company. Execu...
- Question 105: You manage a Microsoft SharePoint Online deployment. You nee...
- Question 106: You have an on-premises Exchange 2010 organization. All clie...
- Question 107: You manage an Office 365 tenant that uses an Enterprise E1 s...
- Question 108: DRAG DROP You are the Office 365 administrator for a company...
- Question 109: DRAG DROP Your company has an Office 365 subscription. A use...
- Question 110: A company is upgrading from Office 2010 to Office 365 ProPlu...
- Question 111: You are the Office 365 administrator for a company. You must...
- Question 112: You are the Office 365 ProPlus administrator for your compan...
- Question 113: HOTSPOT Your company has an Office 365 subscription and uses...
- Question 114: Overview General Overview Contoso, Ltd. is a manufacturing c...
- Question 115: Your company decides to migrate all users to Office 365. As ...
- Question 116: In this section, you will see one or more sets of questions ...
- Question 117: You manage an Office 365 tenant with an Enterprise E3 subscr...
- Question 118: A company uses Office 365 ProPlus. The company has a main of...
- Question 119: DRAG DROP You are the Office 365 administrator for a company...
- Question 120: You open the settings for the site collection and discover t...
- Question 121: HOTSPOT You are the Office 365 administrator for your compan...
- Question 122: You are the Microsoft Lync administrator for a company that ...
- Question 123: DRAG DROP You plan to deploy an Office 365 tenant. The tenan...
- Question 124: You are the Office 365 Administrator for your company. You p...
- Question 125: Note: This question is part of a series of questions that us...
- Question 126: All employees at a company have Exchange Online mailboxes. Y...
- Question 127: DRAG DROP An organization has an Office 365 tenant that uses...
- Question 128: A company uses Skype for Business Online. You need to ensure...
- Question 129: You are the Office 365 administrator for your company. The c...
- Question 130: You manage an Office 365 tenant that uses an Enterprise E1 s...
- Question 131: DRAG DROP In this section, you will see one or more sets of ...
- Question 132: HOTSPOT You manage an Office 365 tenant. You plan to deploy ...
- Question 133: You manage an Office 365 tenant that uses an Enterprise E1 s...
- Question 134: Your company is planning to migrate to Microsoft Exchange On...
- Question 135: DRAG DROP You are the desktop administrator for a company. A...
- Question 136: DRAG DROP Your company uses Microsoft Exchange Online. End u...
- Question 137: DRAG DROP You are the administrator for an Office 365 tenant...
- Question 138: HOTSPOT Contoso, Ltd., has an Office 365 tenant. All employe...
- Question 139: HOTSPOT You are the Microsoft Exchange Online administrator ...
- Question 140: HOTSPOT Contoso, Ltd., has an Office 365 tenant. All employe...
- Question 141: You are the Office 365 administrator for your company. The c...
- Question 142: You implement Skype for Business Online. You deploy the foll...
- Question 143: You are the administrator for Contoso, Ltd. You have an Offi...
- Question 144: Your company subscribes to the Office 365 Enterprise E1 plan...
- Question 145: Your company is planning to migrate to Microsoft Exchange On...
- Question 146: Note: This question is part of a series of questions that pr...
- Question 147: DRAG DROP Your company uses Microsoft SharePoint Online. You...
- Question 148: Your company has a hybrid deployment of Office 365. All mail...
- Question 149: You manage an Office 365 tenant that uses an Enterprise E1 s...
- Question 150: DRAG DROP You are the Office 365 administrator for your comp...
- Question 151: DRAG DROP You have an Office 365 tenant that uses an Enterpr...
- Question 152: HOTSPOT You are the Office 365 administrator for your compan...
- Question 153: DRAG DROP Your company has an Office 365 Enterprise E3 subsc...
- Question 154: HOTSPOT In this section, you will see one or more sets of qu...
- Question 155: Your company has a hybrid deployment of Office 365 that uses...
- Question 156: You are the Office 365 administrator for your company. The c...
- Question 157: HOTSPOT You manage an Office 365 tenant for Contoso, Ltd. Gu...
- Question 158: HOTSPOT You are the Office 365 administrator for your compan...
- Question 159: Overview General Overview Contoso, Ltd. is a manufacturing c...
- Question 160: HOTSPOT Overview Fabrikam, Inc. is a medical billing clearin...
- Question 161: You are the Office 365 administrator for your company. The c...
- Question 162: You manage an Office 365 tenant that uses an Enterprise E1 s...
- Question 163: DRAG DROP You are the Office 365 administrator for your comp...
- Question 164: DRAG DROP You are the Office 365 administrator for your comp...
- Question 165: Note: This question is part of a series of questions that us...
- Question 166: You are the Office 365 administrator for a company. You must...
- Question 167: DRAG DROP You are an Office 365 specialist for a consulting ...
- Question 168: Your company has an Office 365 subscription. You need to add...
- Question 169: HOTSPOT Your company has an Office 365 subscription and uses...
- Question 170: You are deploying an Office 365 tenant that uses an Enterpri...
- Question 171: DRAG DROP Your company uses Office 365. You are planning a u...
- Question 172: A company is upgrading its 3,000 client computers to Office ...
- Question 173: You are the Office 365 administrator for a company. You need...
- Question 174: All employees at a company have Exchange Online mailboxes. Y...
- Question 175: You are the Office 365 administrator for your company. Many ...
- Question 176: HOTSPOT You manage an Office 365 tenant. You plan to deploy ...
- Question 177: Note: This question is part of a series of questions that pr...
- Question 178: You are the Office 365 administrator for a company. You plan...
- Question 179: DRAG DROP An organization has an Office 365 tenant. You hire...
- Question 180: DRAG DROP Your company has an Office 365 subscription. All m...
- Question 181: HOTSPOT A company has an on-premises deployment of Microsoft...
- Question 182: In this section, you will see one or more sets of questions ...
- Question 183: You manage client computing devices for a company. Office 36...
- Question 184: Note: This question is part of a series of questions that pr...
- Question 185: You are the Office 365 administrator for your company. The c...
- Question 186: You are the Office 365 administrator for your company. You n...
- Question 187: Your company has an Exchange Server 2010 Service Pack (SP1) ...
- Question 188: DRAG DROP Your company uses the Office Deployment Tool to de...
- Question 189: You are deploying an Office 365 tenant that uses an Enterpri...
- Question 190: You are the Office 365 administrator for your company. Emplo...
- Question 191: HOTSPOT You have an Office 365 subscription. A user adds an ...
- Question 192: DRAG DROP A company has an Office 365 tenant. You plan to im...
- Question 193: Your company uses Microsoft Exchange Online. Employees frequ...
- Question 194: HOTSPOT You are the Office 365 administrator for a company. ...
- Question 195: You are the Office 365 administrator for your company. Any c...
- Question 196: You are the Office 365 administrator for your company. The c...
- Question 197: You subscribe to Office 365. You plan to implement single si...
- Question 198: Note: This question is part of a series of questions that us...
- Question 199: HOTSPOT Your company subscribes to Office 365 Small Business...
- Question 200: Your company uses Microsoft Exchange Online. Employees frequ...
- Question 201: You are the Office 365 administrator for your company. You n...
- Question 202: Note: This question is part of a series of questions that pr...
- Question 203: Overview General Overview Contoso, Ltd. is a manufacturing c...
- Question 204: HOTSPOT Your company uses Microsoft SharePoint Online. You s...
- Question 205: DRAG DROP You are the Office 365 administrator for a company...
- Question 206: Note: This question is part of a series of questions that us...
- Question 207: Your company has a hybrid deployment of Office 365. You need...
- Question 208: You are the Office 365 administrator for your company. The c...
- Question 209: DRAG DROP Overview Fabrikam, Inc. is a medical billing clear...
- Question 210: Overview Fabrikam, Inc. is a medical billing clearing house ...
