Valid 300-210 Dumps shared by ExamDiscuss.com for Helping Passing 300-210 Exam! ExamDiscuss.com now offer the newest 300-210 exam dumps, the ExamDiscuss.com 300-210 exam questions have been updated and answers have been corrected get the newest ExamDiscuss.com 300-210 dumps with Test Engine here:
Access 300-210 Dumps Premium Version
(170 Q&As Dumps, 35%OFF Special Discount Code: freecram)
<< Prev Question Next Question >>
Question 25/214
SIMULATION
Scenario:
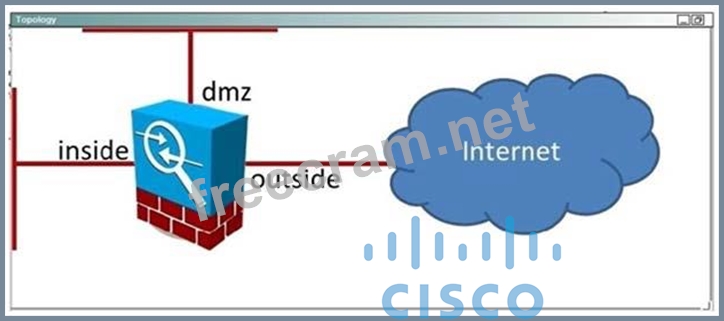
Your organization is deploying the ASA CX software module in the ASA which connects the organization's internal network to the Internet. A colleague has configured the policy on the CX module itself. Your task is to configure the ASA to forward the appropriate traffic to the CX module for processing.
Currently there are no policies configured for the inside interface. Your goal is to match all traffic which traverses the inside interface using the system default class, and send that traffic to the CX module. The CX will use active authentication. Also in the event of a CX module failure, no traffic should be allowed.
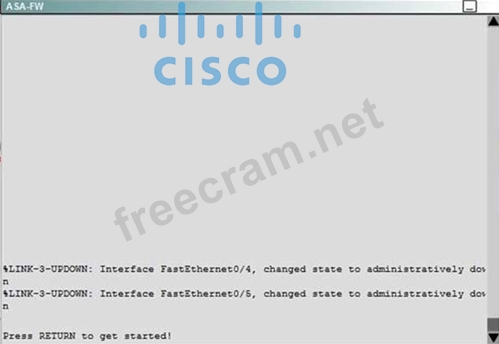
Access to the console of the ASA by clicking on its icon in the topology map. The enable password is Cisco!23. Use inside-policy as the name of the policy map that you configure. After you have successfully applied the policy map to the inside interface, verify that it is active using an appropriate show command.
Scenario:
Your organization is deploying the ASA CX software module in the ASA which connects the organization's internal network to the Internet. A colleague has configured the policy on the CX module itself. Your task is to configure the ASA to forward the appropriate traffic to the CX module for processing.
Currently there are no policies configured for the inside interface. Your goal is to match all traffic which traverses the inside interface using the system default class, and send that traffic to the CX module. The CX will use active authentication. Also in the event of a CX module failure, no traffic should be allowed.
Access to the console of the ASA by clicking on its icon in the topology map. The enable password is Cisco!23. Use inside-policy as the name of the policy map that you configure. After you have successfully applied the policy map to the inside interface, verify that it is active using an appropriate show command.
Correct Answer:
See the solution below.
Explanation/Reference:
Explanation:
Review the explanation part for full solution.
We need to create a policy map named inside-policy and send the traffic to the CXSC blade:
ASA-FW# config t
ASA-FW(config)# policy-map inside-policy
ASA-FW(config-pmap)# policy-map inside-policy
ASA-FW(config-pmap)# class class-default
ASA-FW(config-pmap-c)# cxsc fail-close auth-proxy
ASA-FW(config-pmap-c)# exit
ASA-FW(config-pmap)# exit
The fail-close is needed as per instructions that if the CX module fails, no traffic should be allowed. The auth-proxy keyword is needed for active authentication. Next, we need to apply this policy map to the inside interface:
ASA-FW(config)#service-policy inside-policy interface inside.
Finally, verify that the policy is active:
ASA-FW# show service-policy interface inside
Interface inside:
Service-policy: inside-policy
Class-map: class-default
Default QueueingCXSC: card status Up, mode fail-close, auth-proxy enabled Packet input 181, packet output 183, drop 0, reset-drop 0, proxied 0


- Question List (214q)
- Question 1: An engineer is configuring a Cisco Email Security Appliance ...
- Question 2: Refer to the exhibit. The system administrator of mydomain.c...
- Question 3: The Web Security Appliance has identities defined for facult...
- Question 4: Which five system management and reporting protocols are sup...
- Question 5: When creating an SSL policy on Cisco FirePOWER, which three ...
- Question 6: Which two conditions must you configure in an event action o...
- Question 7: For which task can PRSM be used?...
- Question 8: After configuring an ISR with the Cisco Cloud Web Security c...
- Question 9: Which command verifies that CWS redirection is working on a ...
- Question 10: A user is deploying a Cisco IPS appliance in a data center t...
- Question 11: Which piece of information is required to perform a policy t...
- Question 12: What step is required to enable HTTPS Proxy on the Cisco Web...
- Question 13: Which command applies WCCP redirection on the inside interfa...
- Question 14: Using the Cisco WSA GUI, where should an operator navigate t...
- Question 15: How does a user access a Cisco Web Security Appliance for in...
- Question 16: Which Cisco technology is a modular security service that co...
- Question 17: When centralized message tracking is enabled on the Cisco ES...
- Question 18: Which Cisco ASA SSL VPN feature provides support for PCI com...
- Question 19: When using Cisco AMP for Networks, which feature copies a fi...
- Question 20: (Exhibit) Which signature definition is virtual sensor 0 ass...
- Question 21: Cisco AVC allows control of which three of the following? (C...
- Question 22: What is the CLI command to create a new Message Filter in a ...
- Question 23: Which two options are known limitations in deploying an IPS ...
- Question 24: Which three zones are used for anomaly detection? (Choose th...
- Question 25: SIMULATION Scenario: Your organization is deploying the ASA ...
- Question 26: Which option describes a customer benefit of the Cisco Secur...
- Question 27: Which CLI command is used to generate firewall debug message...
- Question 28: SIMULATION Instructions: Click the grey buttons of this fram...
- Question 29: What is a valid search parameter for the Cisco ESA find even...
- Question 30: Which option is a benefit of deploying Cisco Application Vis...
- Question 31: Which command establishes a virtual console session to a CX ...
- Question 32: A network security design engineer is considering using a Ci...
- Question 33: Which command verifies that the correct CWS license key info...
- Question 34: An engineer must deploy AMP with cloud protection. Which mac...
- Question 35: Which two authentication options can be leveraged for direct...
- Question 36: What command alters the SSL ciphers used by the Cisco Email ...
- Question 37: Which two statement about Cisco Firepower file and intrusion...
- Question 38: Which type of signature is generated by copying a default si...
- Question 39: SIMULATION Your organization has subscribed to the Cisco Clo...
- Question 40: To enable the Cisco ASA Host Scan with remediation capabilit...
- Question 41: Which two design considerations are required to add the Cisc...
- Question 42: Which five system management protocols are supported by the ...
- Question 43: When attempting to tunnel FTP traffic through a stateful fir...
- Question 44: In addition to the CLI, what is another option to manage a C...
- Question 45: What are three benefits of the Cisco AnyConnect Secure Mobil...
- Question 46: DRAG DROP Drag and drop the steps on the left into the corre...
- Question 47: Which Cisco ESA component receives connections from external...
- Question 48: A Cisco AnyConnect user profile can be pushed to the PC of a...
- Question 49: Which five system management protocols are supported by the ...
- Question 50: What is the default IP range of the external zone?...
- Question 51: Which statement about Cisco ASA multicast routing support is...
- Question 52: After adding a remote-access IPsec tunnel via the VPN wizard...
- Question 53: Which option describes what occurs with asymmetric routing w...
- Question 54: Which two conditions must you configure in an event action r...
- Question 55: What is the authentication method for an encryption envelope...
- Question 56: Which three statements about Cisco ASA CX are true? (Choose ...
- Question 57: Which statement about the Cisco CWS web filtering policy beh...
- Question 58: Which three pieces of information are required to implement ...
- Question 59: What is the function of the Cisco Context Adaptive Scanning ...
- Question 60: Access the configuration of the Cisco Email Security Applian...
- Question 61: Which three categories of the seven major risk management ca...
- Question 62: Which Cisco technology combats viruses and malware with viru...
- Question 63: In a Cisco AMP for Networks deployment, which disposition is...
- Question 64: When https traffic is scanned, which component of the full U...
- Question 65: Which option describes how the native VLAN is set up on an I...
- Question 66: At which value do custom signatures begin?...
- Question 67: With Cisco AMP for Endpoints on Windows, which three engines...
- Question 68: Which three options are IPS signature classifications? (Choo...
- Question 69: Cisco's ASA CX includes which two URL categories? (Choose tw...
- Question 70: Which Cisco Cloud Web Security Connector feature allows acce...
- Question 71: Which Cisco technology is a customizable web-based alerting ...
- Question 72: Which two options are the correct URL and credentials used t...
- Question 73: A Cisco Web Security Appliance's policy can provide visibili...
- Question 74: Which three zones are used for anomaly detection in a Cisco ...
- Question 75: When deploying Cisco FirePOWER appliances, which option must...
- Question 76: If learning accept mode is set to "auto" and the knowledge b...
- Question 77: Which four parameters must be defined in an ISAKMP policy wh...
- Question 78: Which two statements about Cisco ESA clusters are true? (Cho...
- Question 79: Which solution must a customer deploy to prioritize traffic ...
- Question 80: Which three options are characteristics of router-based IPS?...
- Question 81: Which three access control actions permit traffic to pass th...
- Question 82: Which command is used to enable strong ciphers on the Cisco ...
- Question 83: Which Cisco AMP for Endpoints, what is meant by simple custo...
- Question 84: Which is the default IP address and admin port setting for h...
- Question 85: Which Cisco ASA configuration command drops traffic if the C...
- Question 86: Who or what calculates the signature fidelity rating?...
- Question 87: When a Cisco Email Security Appliance joins a cluster, which...
- Question 88: Which Cisco Cloud Web Security tool provides URL categorizat...
- Question 89: What are two features of the Cisco ASA NGFW? (Choose two.)...
- Question 90: A Cisco Email Security Appliance uses which message filter t...
- Question 91: Which action cloud reduce the security of the management int...
- Question 92: Which antispam technology assumes that email from server A, ...
- Question 93: Which Cisco technology prevents targeted malware attacks, pr...
- Question 94: (Exhibit) Which two statements about Signature 1104 are true...
- Question 95: (Exhibit) To what extent will the Cisco IPS sensor contribut...
- Question 96: With Cisco FirePOWER Threat Defense software, which interfac...
- Question 97: What can Cisco Prime Security Manager (PRSM) be used to achi...
- Question 98: What are the two policy types that can use a web reputation ...
- Question 99: Which two GUI options display users' activity in Cisco Web S...
- Question 100: During initial configuration, the Cisco ASA can be configure...
- Question 101: (Exhibit) Which three statements about the Cisco IPS applian...
- Question 102: Which four statements are correct regarding management acces...
- Question 103: In order to set up HTTPS decryption on the Cisco Web Securit...
- Question 104: What are two benefits of using SPAN with promiscuous mode de...
- Question 105: Which action is possible when a signature is triggered on th...
- Question 106: Which Cisco ESA command is used to edit the ciphers that are...
- Question 107: A new Cisco IPS device has been placed on the network withou...
- Question 108: Which Cisco technology secures the network through malware f...
- Question 109: What are the initial actions that can be performed on an inc...
- Question 110: Which two types of digital certificate enrollment processes ...
- Question 111: Which IPS signature engine inspects the IP protocol packets ...
- Question 112: Joe was asked to secure access to the Cisco Web Security App...
- Question 113: Which Cisco IOS command uses the default class map to limit ...
- Question 114: Which two configuration steps are required for implementing ...
- Question 115: You have configured a VLAN pair that is connected to a switc...
- Question 116: The security team needs to limit the number of e-mails they ...
- Question 117: What is a primary difference between the web security featur...
- Question 118: Which Cisco Firepower rule action displays a HTTP warning pa...
- Question 119: How are HTTP requests handled by the Cisco WSA?...
- Question 120: Which method does Cisco recommend for collecting streams of ...
- Question 121: DRAG DROP Drag and drop the steps on the left into the corre...
- Question 122: Which Cisco WSA is intended for deployment in organizations ...
- Question 123: Over the period of one day, several Atomic ARP engine alerts...
- Question 124: What is the function of the Web Proxy Auto Discovery protoco...
- Question 125: Which three user roles are partially defined by default in P...
- Question 126: Which statement regarding hashing is correct?...
- Question 127: (Exhibit) Between the Cisco ASA configuration and the Cisco ...
- Question 128: Which two TCP ports can allow the Cisco Firepower Management...
- Question 129: An engineering team has implemented Transparent User Identif...
- Question 130: DRAG DROP Drag and drop the terms on the left onto the corre...
- Question 131: In which way are packets handled when the IPS internal zone ...
- Question 132: Which statement about the default configuration of an IPS se...
- Question 133: Which two commands are used to verify that CWS redirection i...
- Question 134: A network engineer can assign IPS event action overrides to ...
- Question 135: Which three statements about threat ratings are true? (Choos...
- Question 136: Which technology is used to improve business-critical applic...
- Question 137: Connections are being denied because of SenderBase Reputatio...
- Question 138: The helpdesk was asked to provide a record of delivery for a...
- Question 139: Which policy must you edit to make changes to the Snort prep...
- Question 140: Which type of server is required to communicate with a third...
- Question 141: Which detection method is also known as machine learning on ...
- Question 142: An engineer must architect an AMP private cloud deployment. ...
- Question 143: By default, which access rule is applied inbound to the insi...
- Question 144: Which option represents the cisco event aggregation product?...
- Question 145: Which set of commands changes the FTP client timeout when th...
- Question 146: What three alert notification options are available in Cisco...
- Question 147: Which two dynamic routing protocols are supported in Firepow...
- Question 148: Using the default modular policy framework global configurat...
- Question 149: Refer to the exhibit. What CLI command generated the output?...
- Question 150: Which two statements regarding the basic setup of the Cisco ...
- Question 151: Which interface on the Cisco Email Security Appliance has HT...
- Question 152: What are three arguments that can be used with the show cont...
- Question 153: When learning accept mode is set to auto, and the action is ...
- Question 154: Which feature does Acceptable Use Controls use to implement ...
- Question 155: Which Cisco monitoring solution displays information and imp...
- Question 156: What is the correct deployment for an IPS appliance in a net...
- Question 157: Which statement about the Cisco ASA botnet traffic filter is...
- Question 158: (Exhibit) What action will the sensor take regarding IP addr...
- Question 159: A user wants to deploy your managed device in Layer 3 routed...
- Question 160: Which option is a benefit of Cisco hybrid email security?...
- Question 161: A network engineer may use which three types of certificates...
- Question 162: Which three webtype ACL statements are correct? (Choose thre...
- Question 163: With Cisco ASA active/standby failover, what is needed to en...
- Question 164: Your organization has subscribed to the Cisco Cloud Web Secu...
- Question 165: What CLI command configures IP-based access to restrict GUI ...
- Question 166: Which Cisco AMP file disposition valid?...
- Question 167: What are three best practices for a Cisco Intrusion Preventi...
- Question 168: Which SSL traffic decryption feature is used when decrypting...
- Question 169: How many interfaces can a Cisco ASA bridge group support and...
- Question 170: Which option lists the minimum requirements to deploy a mana...
- Question 171: Which Cisco ASA object group type offers the most flexibilit...
- Question 172: Which port is used for CLI Secure shell access?...
- Question 173: Which two benefits are provided by the dynamic dashboard in ...
- Question 174: Where in the Cisco ASA appliance CLI are Active/Active Failo...
- Question 175: Which Cisco Security IntelliShield Alert Manager Service com...
- Question 176: Which IPS signature regular expression CLI command matches a...
- Question 177: What is the default antispam policy for positively identifie...
- Question 178: A Cisco ASA requires an additional feature license to enable...
- Question 179: Using the Cisco WSA GUI, where should an operator navigate t...
- Question 180: What is the access-list command on a Cisco IPS appliance use...
- Question 181: When a user receives an encrypted email from a Cisco ESA, wh...
- Question 182: Which two statements about Cisco Cloud Web Security function...
- Question 183: Refer to the exhibit. When designing the network to redirect...
- Question 184: Which statement about Cisco IPS Manager Express is true?...
- Question 185: Which step is required when you configure URL filtering to C...
- Question 186: Which platform has message tracking enabled by default?...
- Question 187: A security engineer is configuring user identity for the Cis...
- Question 188: An ASA with an IPS module must be configured to drop traffic...
- Question 189: Which two commands are valid URL filtering commands? (Choose...
- Question 190: Elliptic curve cryptography is a stronger more efficient cry...
- Question 191: Which four methods are used to deploy transparent mode traff...
- Question 192: Which three functions can Cisco Application Visibility and C...
- Question 193: Which two statements about devices within a Cisco ESA cluste...
- Question 194: Refer to the exhibit. What are two facts about the interface...
- Question 195: (Exhibit) What is the status of OS Identification?...
- Question 196: Which signature engine is responsible for ICMP inspection on...
- Question 197: Which description of an advantage of utilizing IPS virtual s...
- Question 198: Upon receiving a digital certificate, what are three steps t...
- Question 199: With Cisco IDM, which rate limit option specifies the maximu...
- Question 200: Which Cisco WSA is intended for deployment in organizations ...
- Question 201: Which version of AsyncOS for web is required to deploy the W...
- Question 202: Refer to the exhibit. Which four rows exhibit the correct WC...
- Question 203: Which three statements concerning keystroke logger detection...
- Question 204: Which option describes the role of the Learning Accept Mode ...
- Question 205: What is the default CX Management 0/0 IP address on a Cisco ...
- Question 206: Your corporate finance department purchased a new non-web-ba...
- Question 207: Which statement about the Cisco ASA CX role in inspecting SS...
- Question 208: Which two practices are recommended for implementing NIPS at...
- Question 209: (Exhibit) How many Cisco ASAs and how many Cisco WSAs are pa...
- Question 210: What is the function of the Web Proxy Auto-Discovery protoco...
- Question 211: Which three search parameters are supported by the Email Sec...
- Question 212: Which two options are features of the Cisco Email Security A...
- Question 213: Which four advanced endpoint assessment statements are corre...
- Question 214: Which Cisco Web Security Appliance design requires minimal c...
